
Documentation
We are glad to have you here! In our documentation you’ll find everything you need to work with Forms Bridge.
Forms Bridge is a powerful tool to integrate your WordPress forms with third party systems over HTTP requests. The approach of this plugin is to escape from closed solutions and to bring to the user a set of tools to make him autonomous to set up his own integrations. At the same time, “With great power comes great responsibility” and basic knowledge of how HTTP and REST APIs works is required.
You can complement this documentation with the tutorials of the blog. If you miss something or think a new tutorial may be interesting for the community, send us a message through the contact form.
Getting started
This guide is an introduction to the Forms Bridge plugin for WordPress. With various examples, this tutorial explains how to setup a bridge that connects WordPress forms with remote systems over the network.
Install a form builder
Forms Bridge is a system to bridge WordPress forms with backends over HTTP requests. Forms Bridge itself does not build forms, but is capable to work with the most used WordPress form builder plugins.
You can install Forms Bridge without any form builder installed on your WordPress instance, but without one of the supported ones, this plugin is useless. So lets start by installing one of the supported plugins:
For this example we will work with Contact Form 7 and the default contact form that comes out of the box with it.
Set up a backend
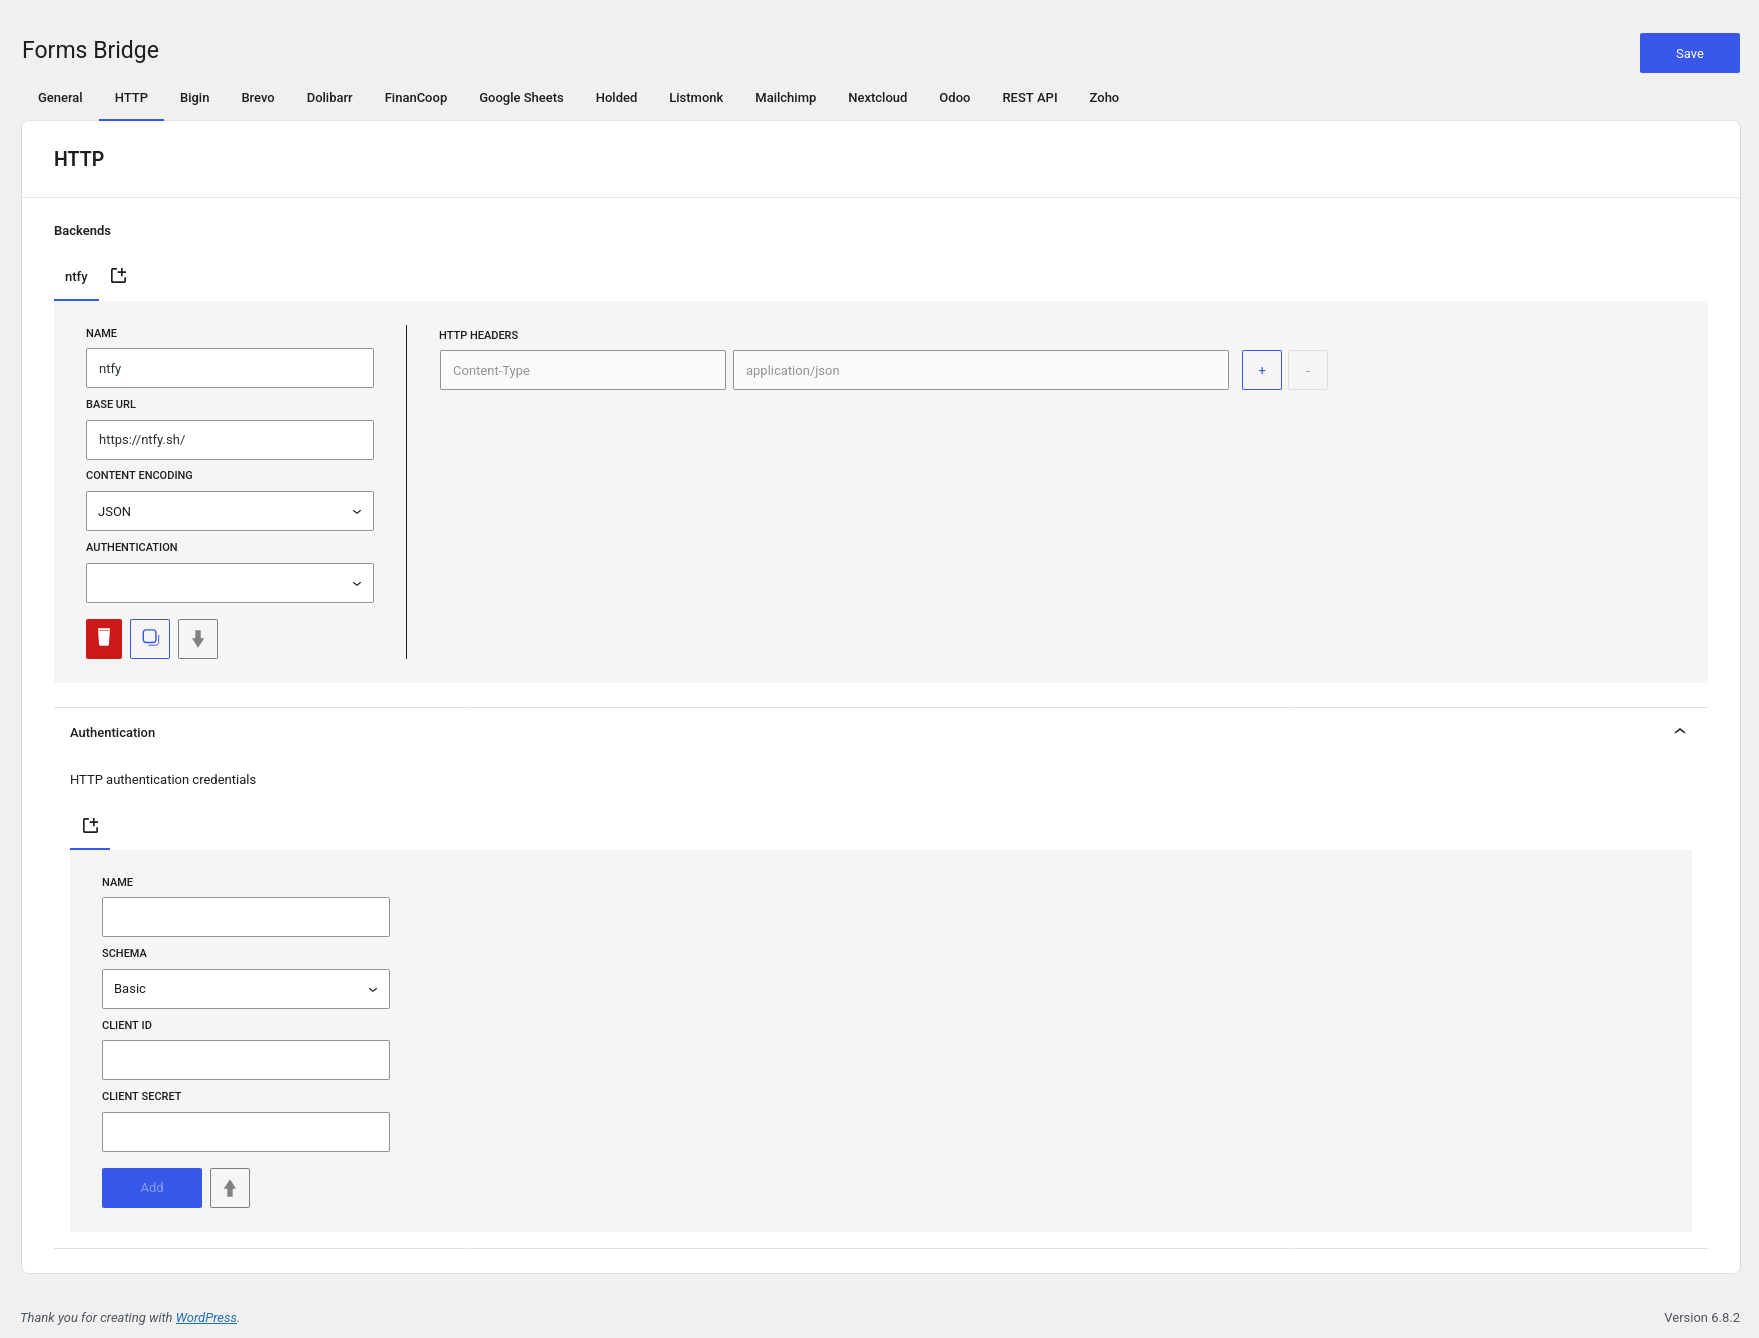
The first step to establish a bridge between your WordPress forms and your backend or service, is to register the backend / service connection. On the admin panel, go to Settings > Forms Bridge to open the plugin’s settings page and go to the HTTP tab. If it’s your first time here, you will find a screen like this:
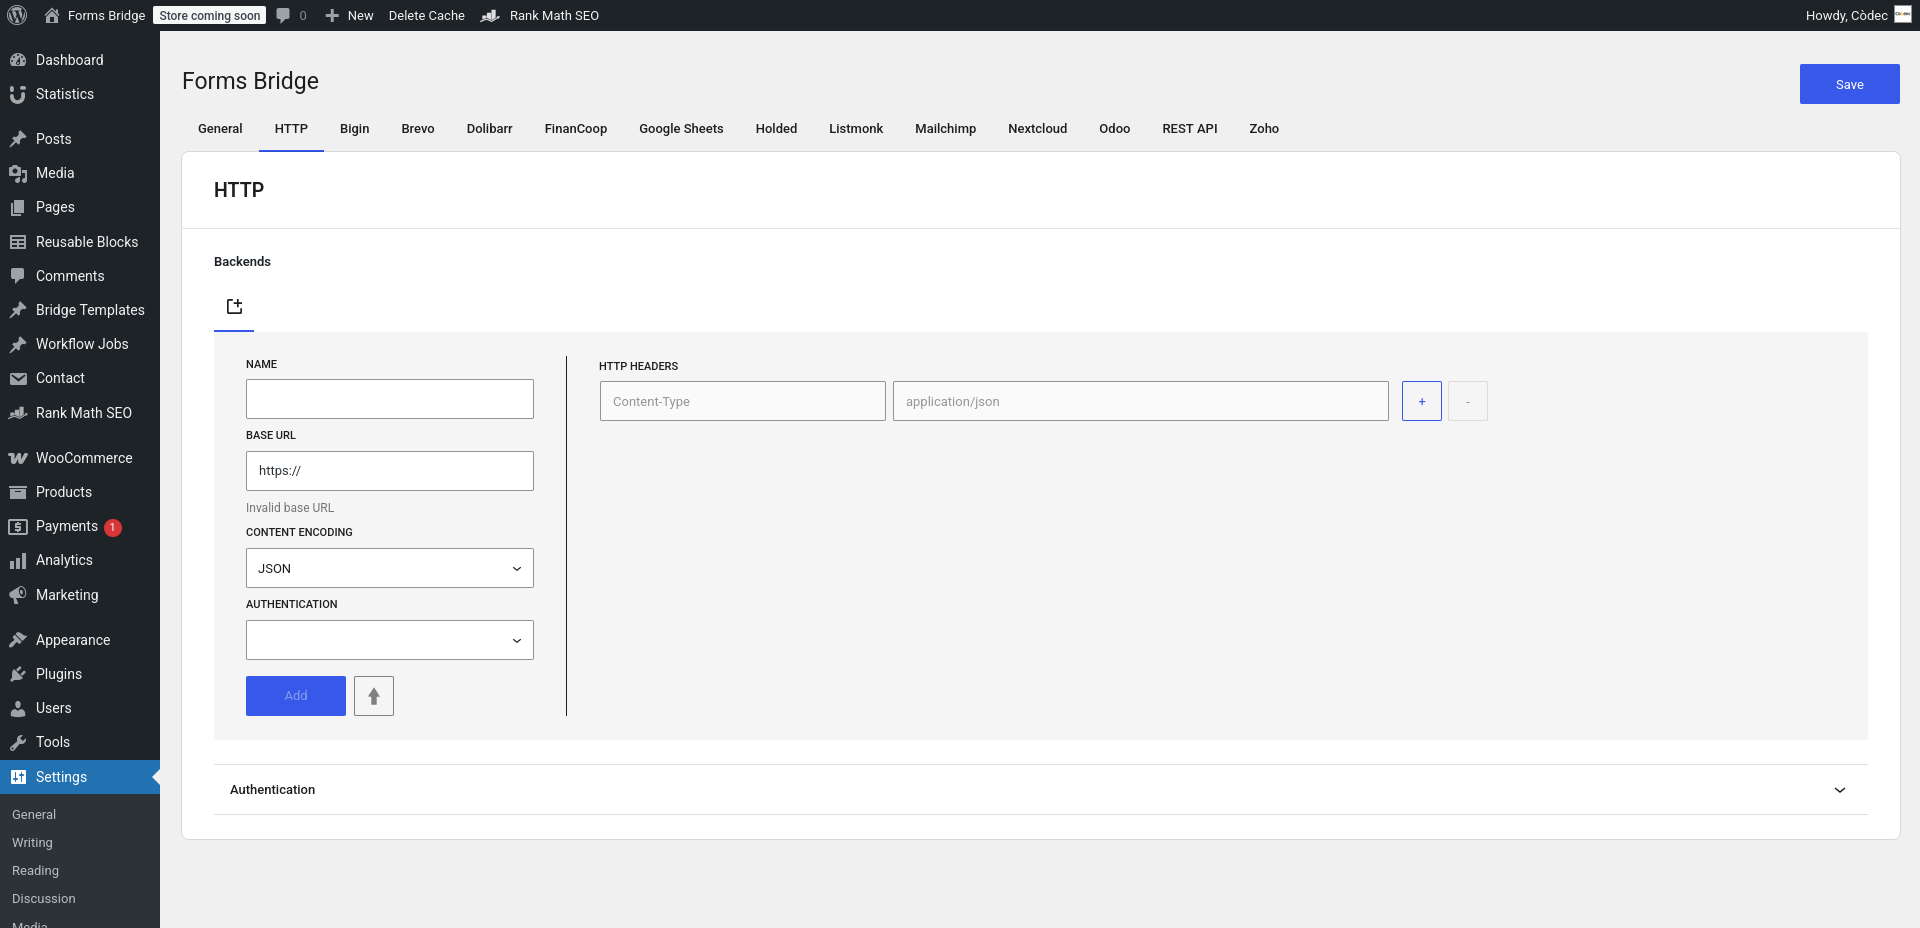
A backend is nothing more than a URL, an array of headers and a unique name to identify it. Start by typing a name and a URL and then click the Add button. Once done, you can add more headers to your backend connection.
A good practice is to use your backend URL domain as the backend URL, without path and use the path as part of your bridge endpoints!
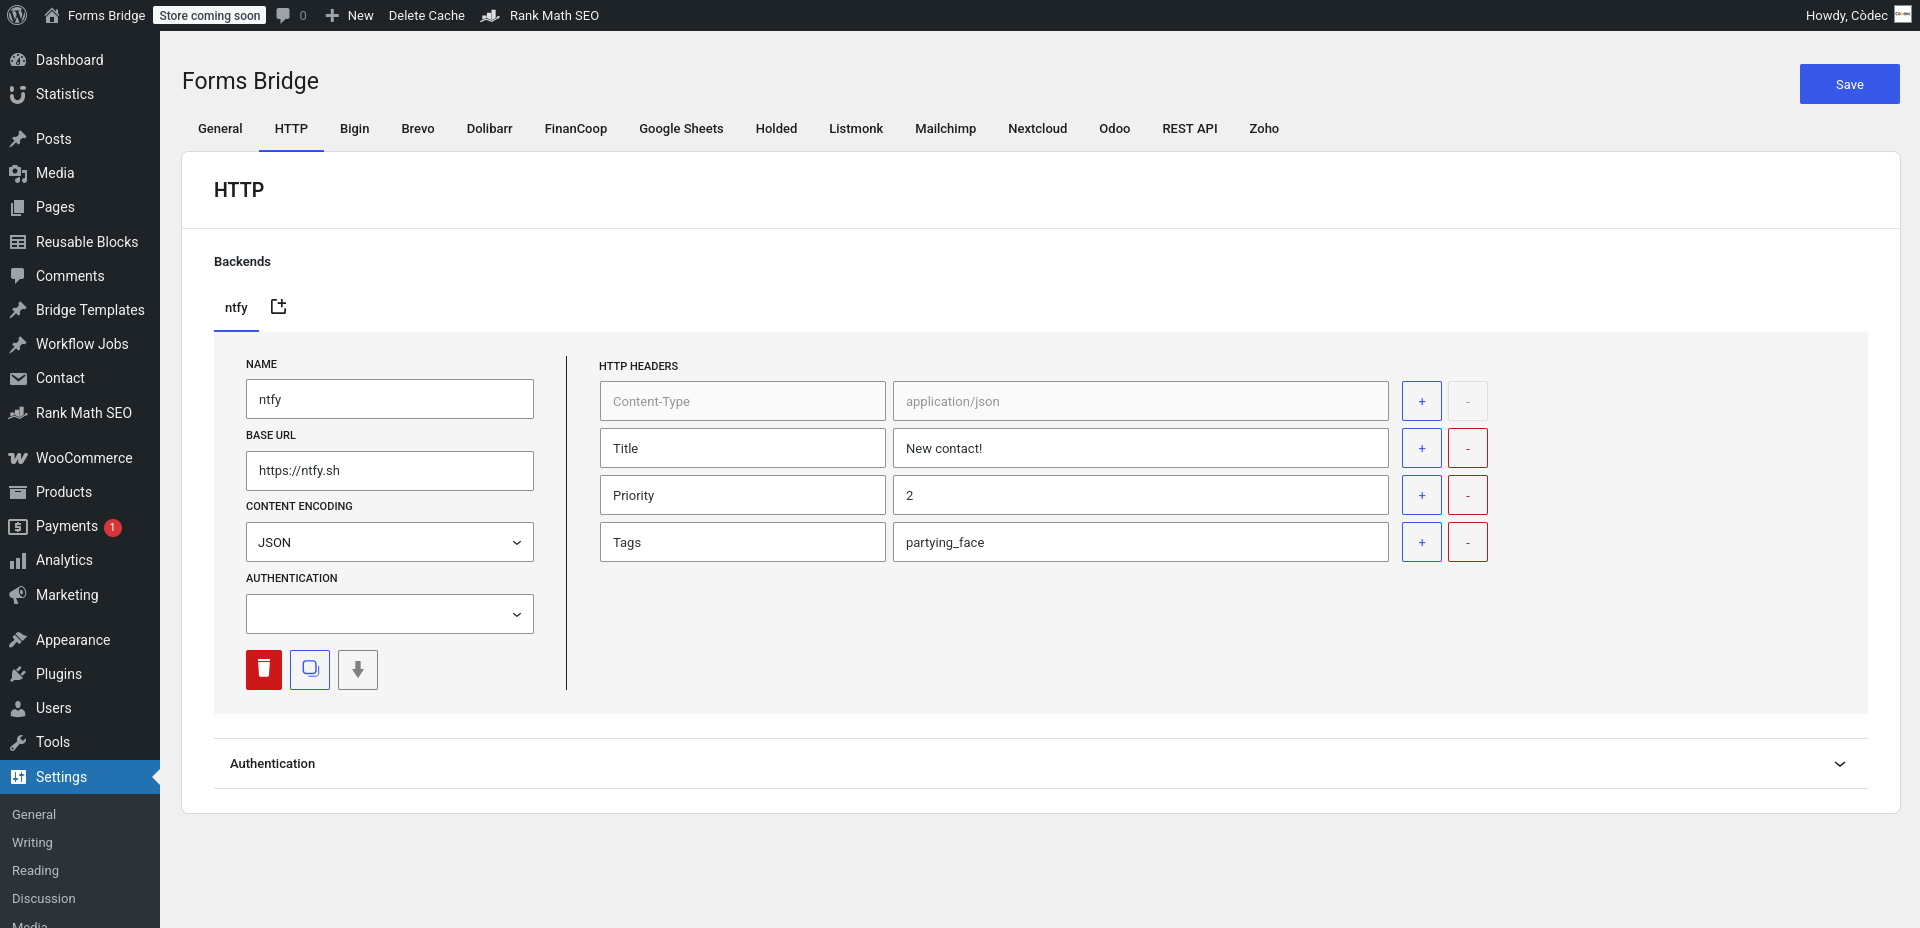
In this example, we will work with ntfy, a simple HTTP-based pub-sub notification service. With backend headers we can set the ntfy notification title, priority and tags, in addition to the content type of our message.
The content type header has a special role on the backend connection setup: It controls how the bridge data will be encoded. To select between the available encoding schemas, use the Content Encoding schema selector.
Connect your form
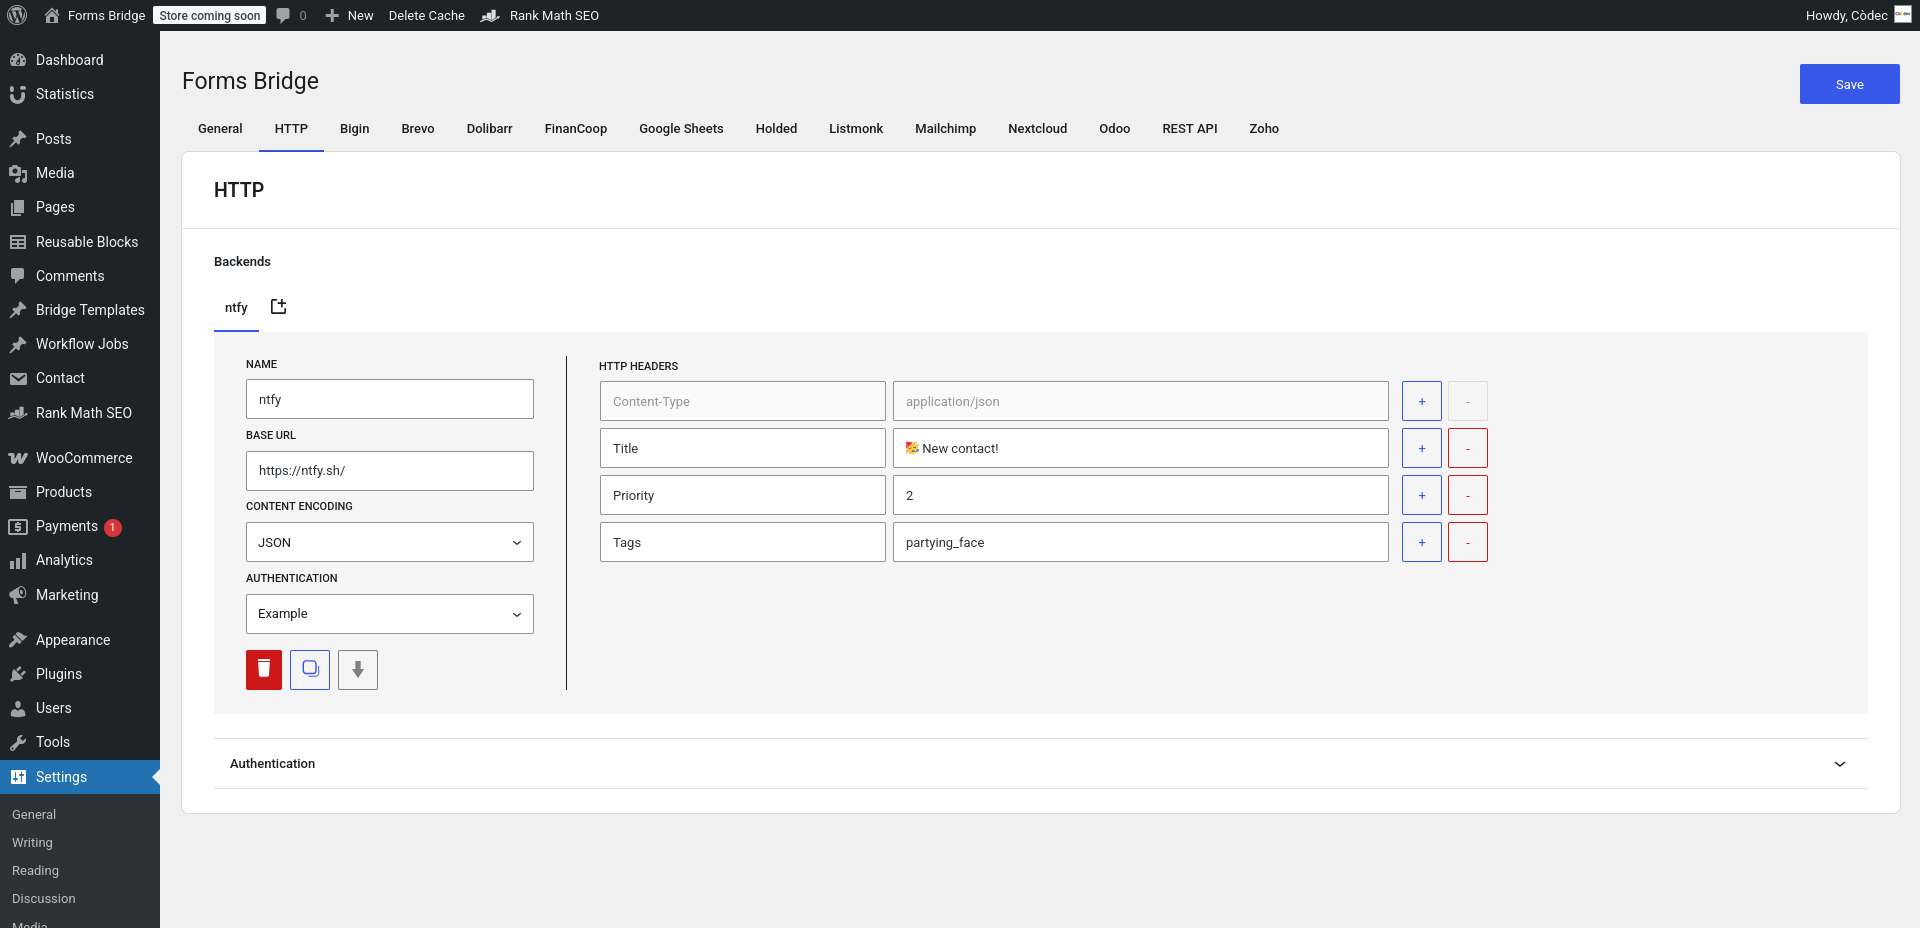
Once you have your backend connection configured, you can start using it on your bridges. Let’s bridge our contact form to ntfy. Go to the REST API tab and create a new bridge. A bridge needs a unique name, a form, a backend, an HTTP method and an endpoint. Depending on the add-on you use, the bridge will need more or less fields.

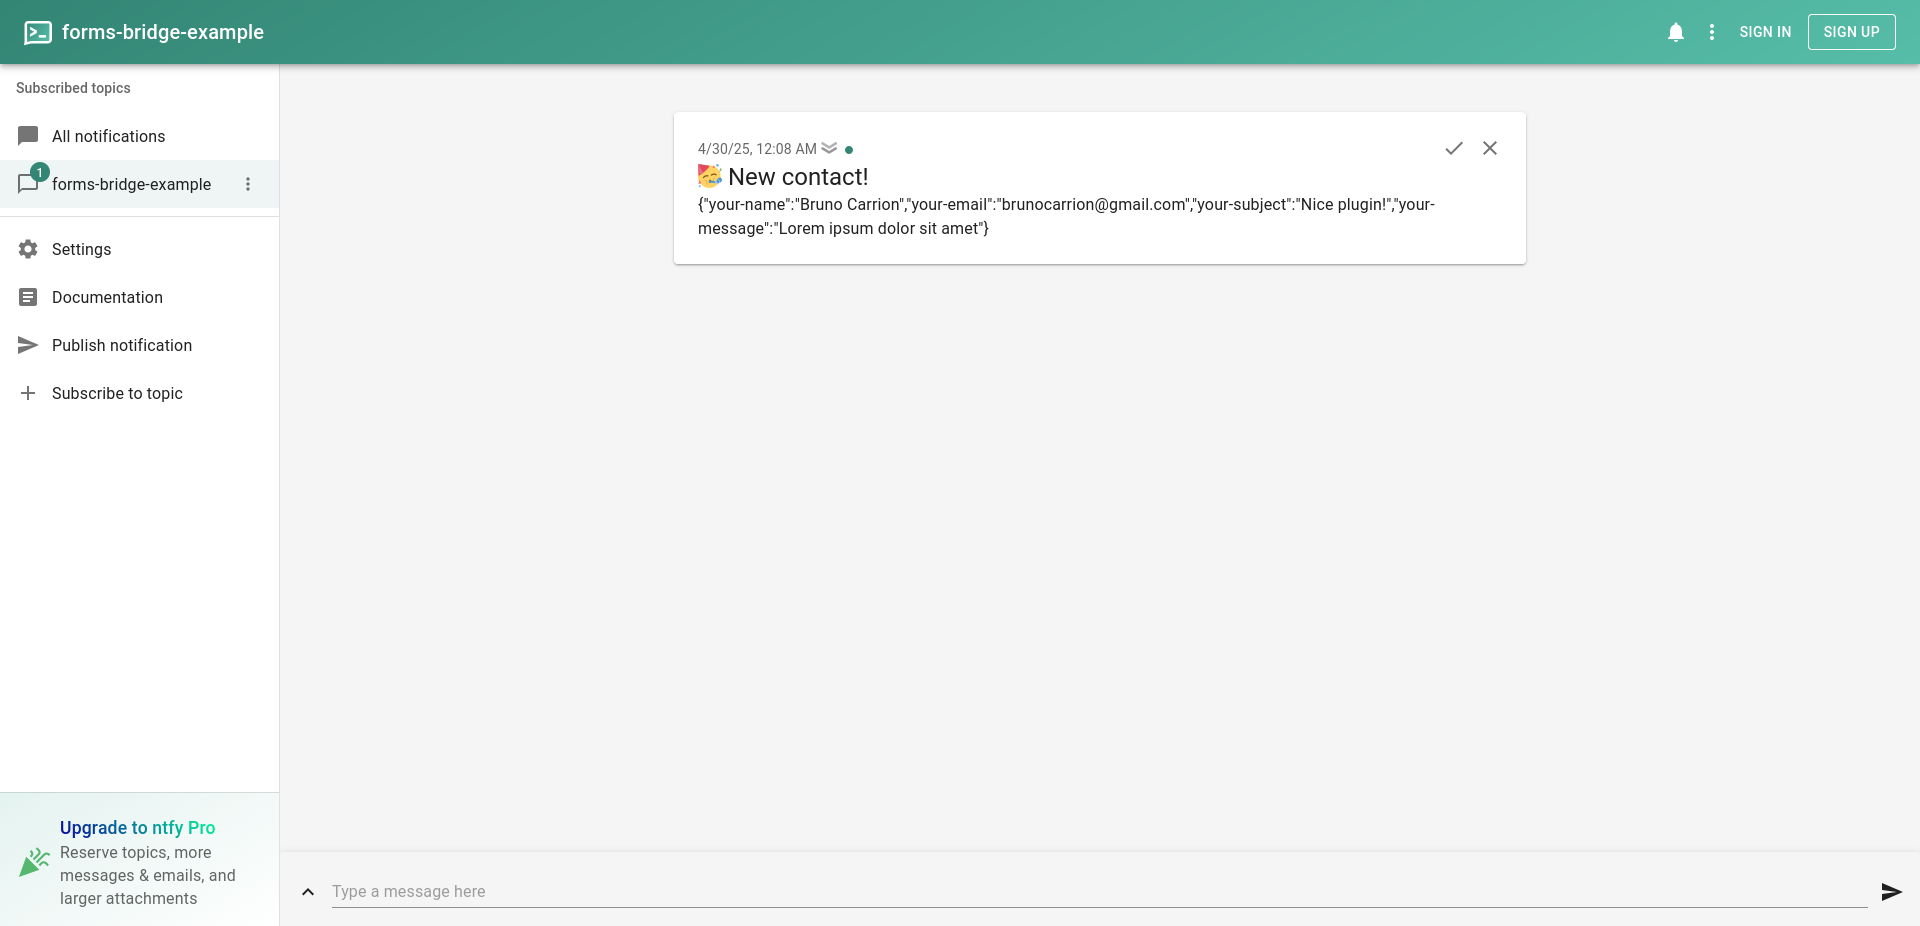
In our example, we’ve set Contacts as the name of the bridge, and bridged our contact form to the /forms-bridge-example endpoint of the ntfy backend using the POST method. After that, we got our first bridge 🎉.
Now, if someone fills up our contact form, a notification will be received on the forms-bridge-example topic on ntfy. You can subscribe your devices to the topic and get notified every time a new form submission is placed on your web.
This is a basic setup. With this as a starter point, now you can add custom fields to the bridge, set up field mappers or configure a workflow to process your data before it is sent. We will cover these subjects on the following chapters of the documentation.
Settings page
To get you to the settings page go to Settings > Forms Bridge on the admin page of your WordPress site. This page is where you can configure and create your form bridges.
General settings
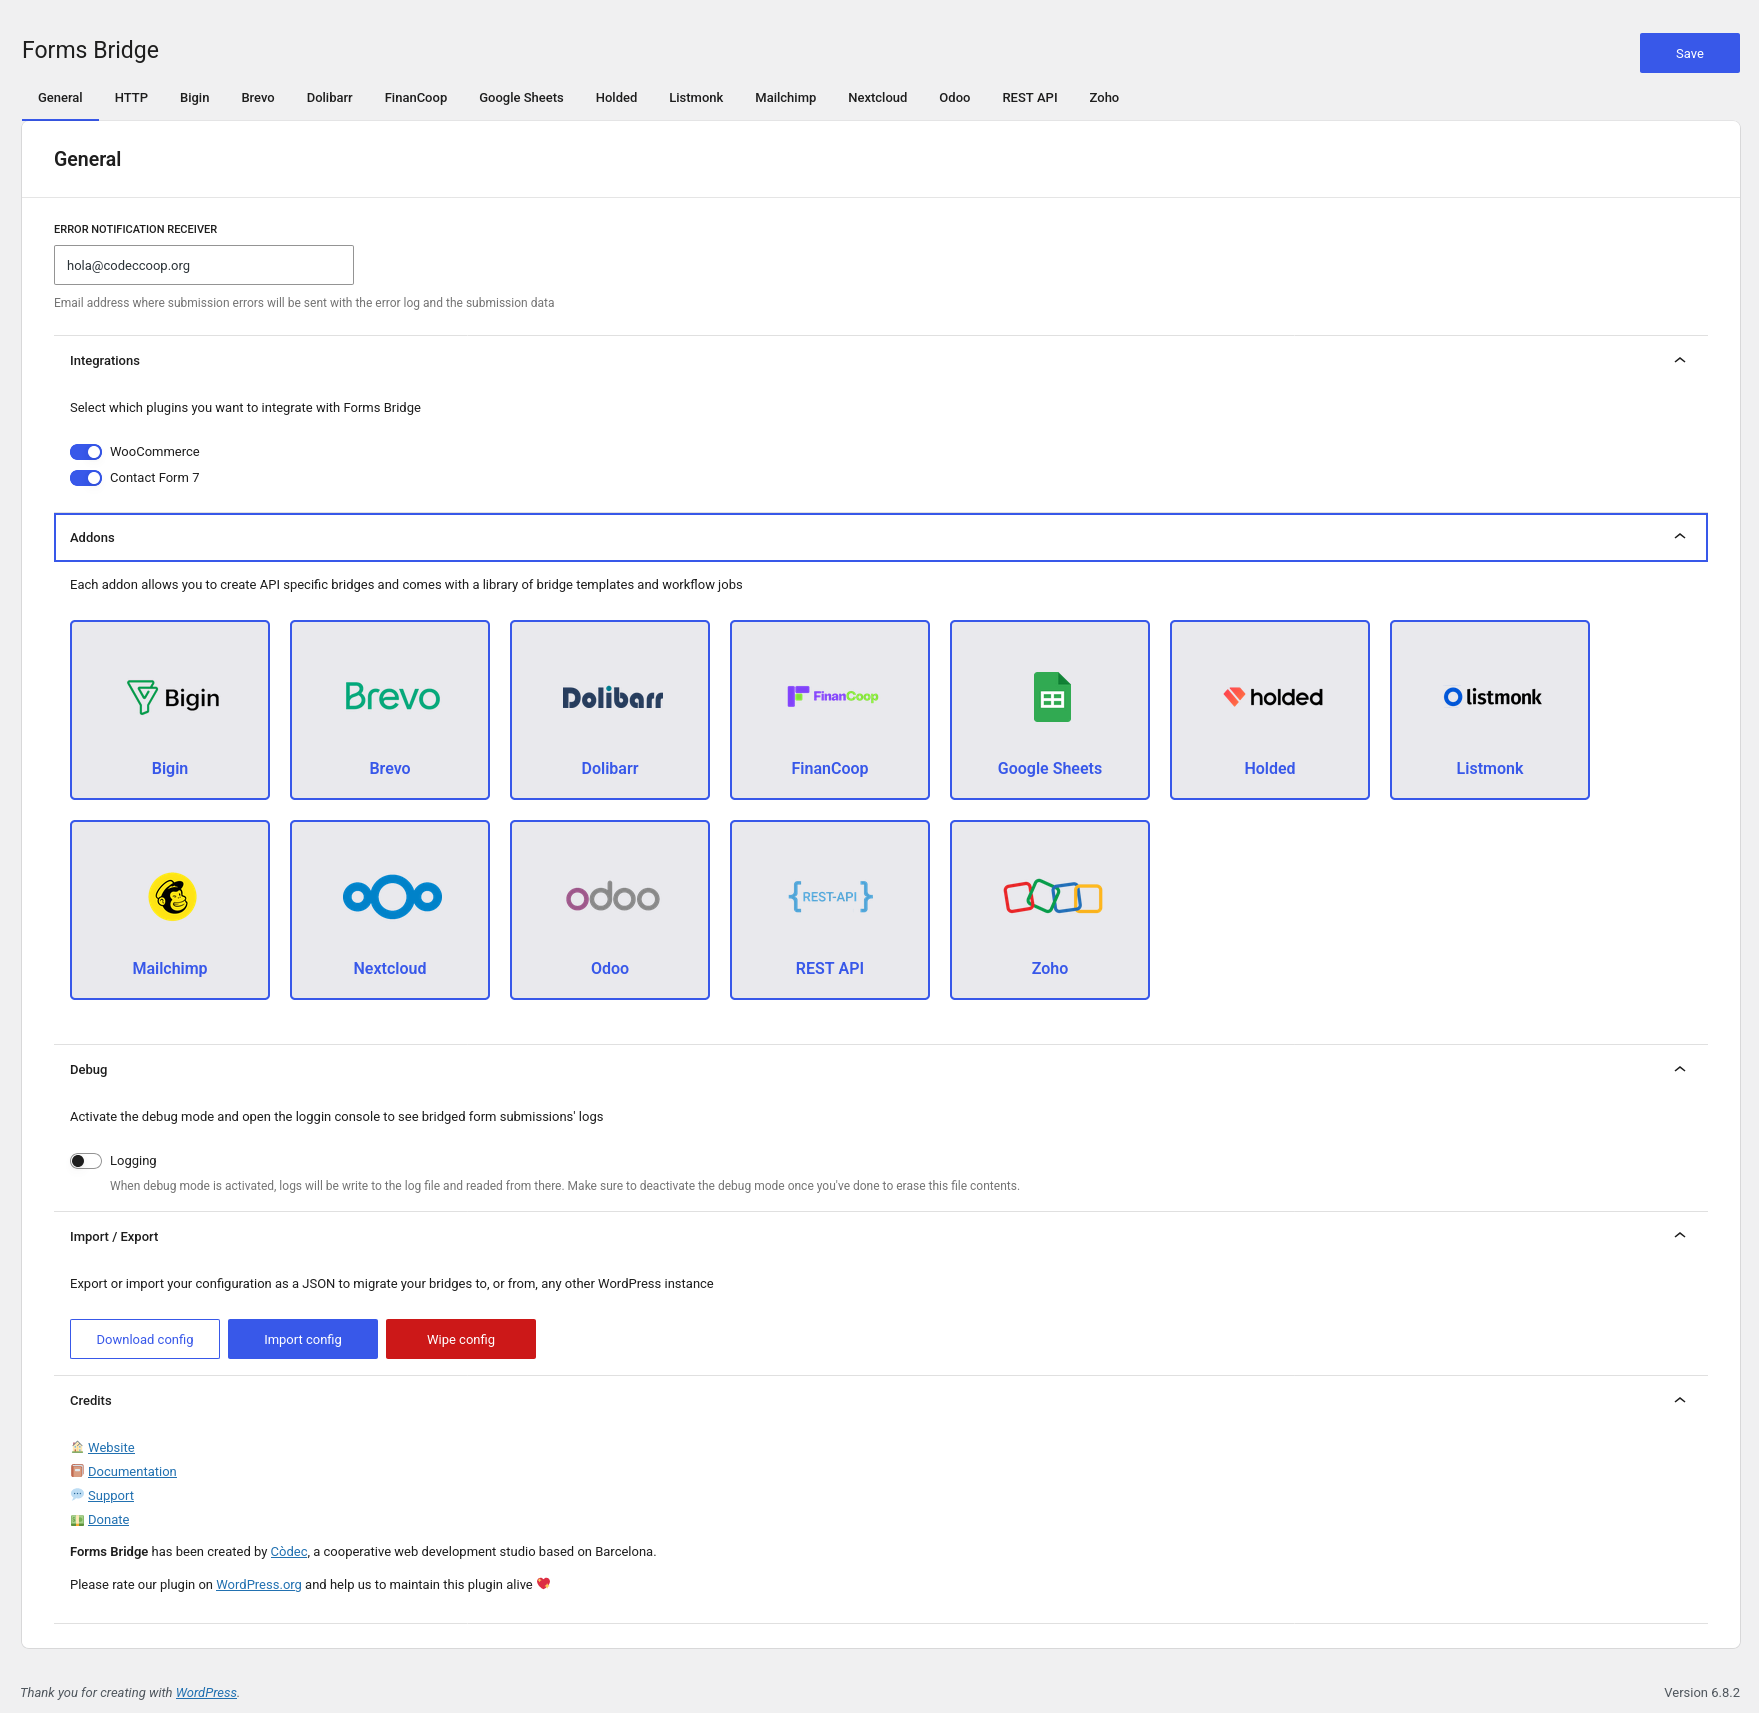
- Notification receiver: Email address where submission error reports will be sent.
- Form builders: This panel is only visible if your WordPress instance has more than one form bulder installed (or none of them) and allows you to control with which builder should Forms Bridge work.
- Add-ons: Activate and deactivate add-ons. Each add-on open a new API tab, with new bridges, templates and workflow jobs. REST API add-on is enabled by default.
- Debug: Activate the logging mode to open the console and get logs of your bridges in real time.
- Import / Export: Import or export your Forms Bridge configurations as JSON files and move it between instances with easy!
- Credits: Credits about the plugin and Còdec.
HTTP settings
- Backends: Backends are reusable and add-on independent. Configure your backend connections on the HTTP tab and reuse them on your add-on tabs.
- Authentication: If your backend requires some kind of standard HTTP authentication, you can use this panel to register authentication credentials. There are 7 types of credentials: Basic, Token, Digest, URL, OAuth, Bearer and RPC.
Add-on tabs
Each time you activate a new add-on, a new add-on tab will be visible on the settings page. Navigate to this tab and start bridging your forms to the add-on’s API. To get more detail about add-ons, go the the add-ons chapeter.
Form builders
Form builders are well known plugins that add forms to WordPress. You can install Forms Bridge without any form builder installed on your WordPress instance, but without one of the supported builders, this plugin is useless, so take a look at our supported integrations and start by installing one of them, if you didn’t it already.
Once a form builder is installed, Forms Bridge will detect it automatically and gets its forms displayed on the settings page.
Forms Bridge can work with multiple form builders at the same time. To get more than one running in parallel, you only have to go to the settings page and choose with which of the installed plugins do you want to work with.
If you have only one builder plugin installed, Forms Bridge will treat it as the active one and hide the form builders panel on the settings page.
Supported form builders


Help us to improve 💪
If you could choose a new form builder for Forms Bridge, which one would you choose?
Backends
In Forms Bridge, a backend is a set of configurations that handles the connection information and credentials required to get your form submissions bridged over HTTP requests to a remote system. Go to Settings > Forms Bridge > HTTP to configure your backend connections.
In the backends panel, you can configure as many backend connections as you need. To create a new backend connection, you have to set the following fields:
- Name: A label to identify the backend. Backend names should be unique as it is the internal identifier Forms Bridge use to bind backends to bridges.
- Base URL: The base URL of your backend. The URL should start with http:// or https://. This base URL will be prepended to the bridge endpoint on runtime when a bridge is sending form submissions to your backend.
- Encoding schema: Select how the bridge payload will be encoded on the HTTP request body. You can use one of the standard schemas, or use a custom one.
- Authentication: Chose one of your registered authentication credentials, if required.
- Headers: An array of HTTP headers. By default, this table will has the Content Type header. In addition, you can add as many headers as you want.
The Content Type header is a special header on Forms Bridge because it controls how Forms Bridge will encode your form payloads on the HTTP requests’ body. This is the only required header of a backend connection. If your bridge needs a custom encoding schema, you can select the Custom encoding option and manually fill the header value. If this is the case, remember to use the forms_bridge_payload filter to encode your form submissions and return them as a string. See the filters API chapter for more information about this filter.
Authentication
The Forms Bridge backend system implements the most common HTTP authentication standards. With authentication credentials you can register user credentials required to perform authenticated requests to your backends. Go to Settings > Forms Bridge > HTTP to configure your authentication credentials.
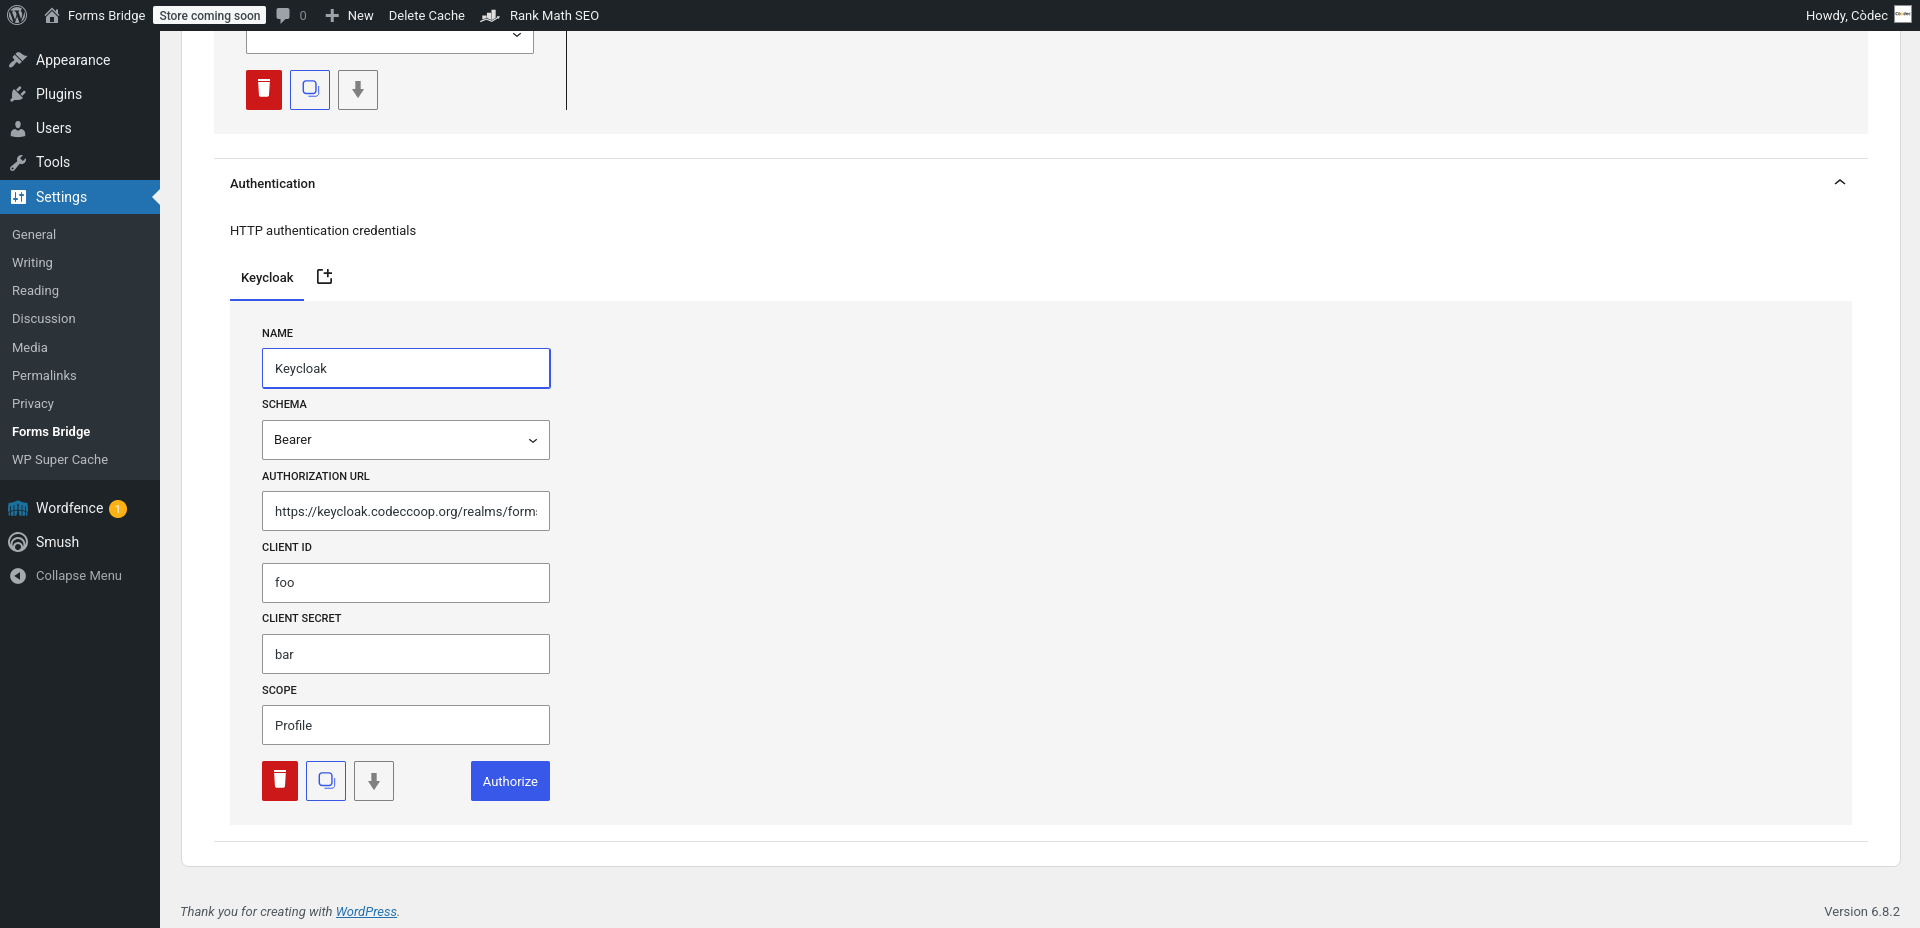
On the authentication panel you can configure as many credentials as you need. To create a new credential you have to chose between the 5 available authentication schemas:
- Basic: In basic HTTP authentication, a request contains a header field in the form of
Authorization: Basic <credentials>, where<credentials>is the Base64 encoding ofclient_idandclient_secretjoined by a single colon:. - Token: In token HTTP authentication, a request contains a header field in the form of
Authorization: token <credentials>, where<credentials>is theclient_idandclient_secretjoined by a single colon:as plain text. - URL: A variation of the basic schema where the
client_idandclient_secretare placed on the request URL as plain text values as followshttps://<client_id>:<client_secret>@<backend_url>. - Digest: It applies a hash function to the
client_id,realmandclient_secretbefore sending them over the network with usage of nonce values. - OAuth: OAuth provides a method for clients to access a protected resource on behalf of a resource owner. In the general case, before a client can access a protected resource, it must first obtain an authorization grant from the resource owner and then exchange the authorization grant for an access token. The
client_id,client_secretandscopefields are used to get this authorization grant performing an authentication request to theAuthorization URL. - Bearer: Bearer Tokens are security tokens that grants the “bearer” (i.e., the party presenting the token) access to protected resources. The
access_tokenfield of the credential will be sent in the HTTPAuthorizationheader as follows:Authorization: Bearer <token>. - RPC: In RPC authentication, the
client_id,client_secretanddatabaseparameters are shared with the backend as the payload of an RPC login call to obtain the user ID and session required to perform authorized requests.
Depending on the schema you chose, the credential form will require more or less fields.
Once you have your credentials registered, you can use them on your backend connection settings. If a backend has an authentication credential registered, Forms Bridge will apply the authentication schema to get authorized access to the backend resources.
The OAuth schema requires an authorization request to the authorization server to obtain access and refresh tokens. This requests has to be done on registration time and once done successfully, the tokens will be stored on the database. If an OAuht credential has been authorized by the server, the credential will be frozen until you revoke the stored tokens.
API keys are not part of an HTTP authentication standard schema. If your backend use this kind of authentication, simply register it as an HTTP header in the backend.
Bridges
Bridges are the core concept of the plugin. A bridge is a pipeline that connects WordPress forms with backends or services over HTTP requests. The bridge pipeline has two ends, the form on one hand, and the backend on the other. Form submissions data will go through the bridge pipeline from WordPress to the backend. In the process, you can add custom fields to the payload and manipulate the data on the bridge workflow.
A bridge is tied to an API, so to create bridges you need to have at least one add-on enabled. Each Forms Bridge add-on comes with a new bridge class with the ability to communicate with the respective API. Forms Bridge have REST API bridges enabled by default.
Custom fields
Custom fields are data that will be added to the bridge payload on runtime. Use them to store private data you don’t want to place on your public forms, like user emails, or config values, like product IDs or lead tags.
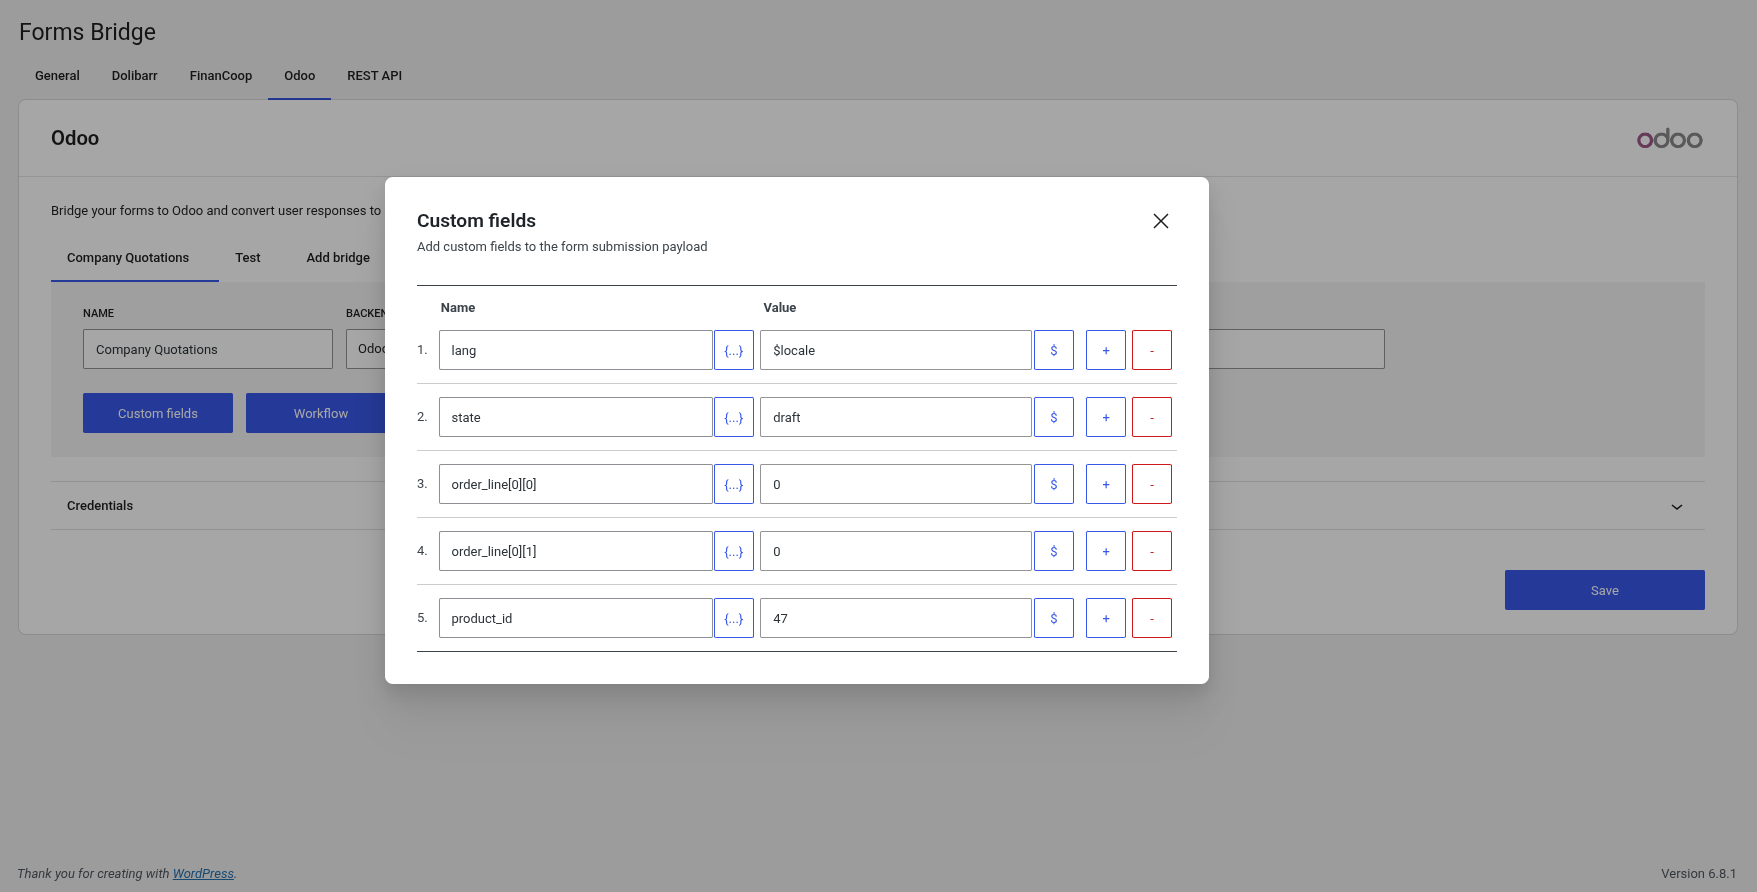
Each bridge has its own custom fields. A custom field is a pair of key-value, with the name on the left side, and the value on the right. Click on the Custom fields button of a bridge to open the fields table.
Custom fields are added to the payload at the beginning of the bridge pipeline, so you can access this data on the mappers table and the workflow jobs.
If it is possible, Forms Bridge will introspect the bridge API schema each time the custom fields panel is opened. This introspection will return the list of the API endpoint fields. To access this list simply click on the {…} button and select an option to set its value as the field name. With this feature, Forms Bridge helps to map your submission fields to the API schema.
The API introspection only works with well known APIs.
REST API bridges does not performs this introspection because it’s an abstract bridge not tied to any specific API. If the introspection can’t be done, the button will be disabled.
For field names you can use json fingers. A json finger is a hierarchical pointer to data structures like children[0].name.rendered. With json finger as field names, you can add to the form submission nested values inside objects or arrays.
For the values, you can define constant values –simply type it on the value input of the field–, or make use of meta tags. Each meta tag will be replaced with its context value on runtime. Click on the $ button to see all available tags. You can add more than one tag to the field value, or combine tags with strings into a composed value.
Available meta tags
| Meta tag | Description |
|---|---|
| $form_id | ID of the submission source form |
| $submission_id | ID of the form submission |
| $site_title | WordPress site title |
| $site_description | WordPress site description |
| $site_url | WordPress URL address |
| $admin_email | WordPress admin email address |
| $wp_version | WordPress instance version |
| $ip_address | IP address of the user |
| $referer | URL of the page where the form submission comes from |
| $user_agent | User agent of the browser of the user |
| $browser_locale | Accept-Language header value of the browser request |
| $locale | Locale of the page where the form is displayed. |
| $language | Language name of the page locale |
| $datetime | Submission datetime in Y-m-d H:m:s format |
| $gmt_datetime | Submission GMT datetime in Y-m-d H:m:s format |
| $timestamp | Submission timestamp |
| $iso_date | Submission datetime in ISO 8601 format |
| $gmt_iso_date | Submission GMT datetime in ISO 8601 format |
| $user_id | With active user sessions, ID of the user |
| $user_login | With active user sessions, name of the user |
| $user_name | With active user sessions, name of the user |
Field mappers
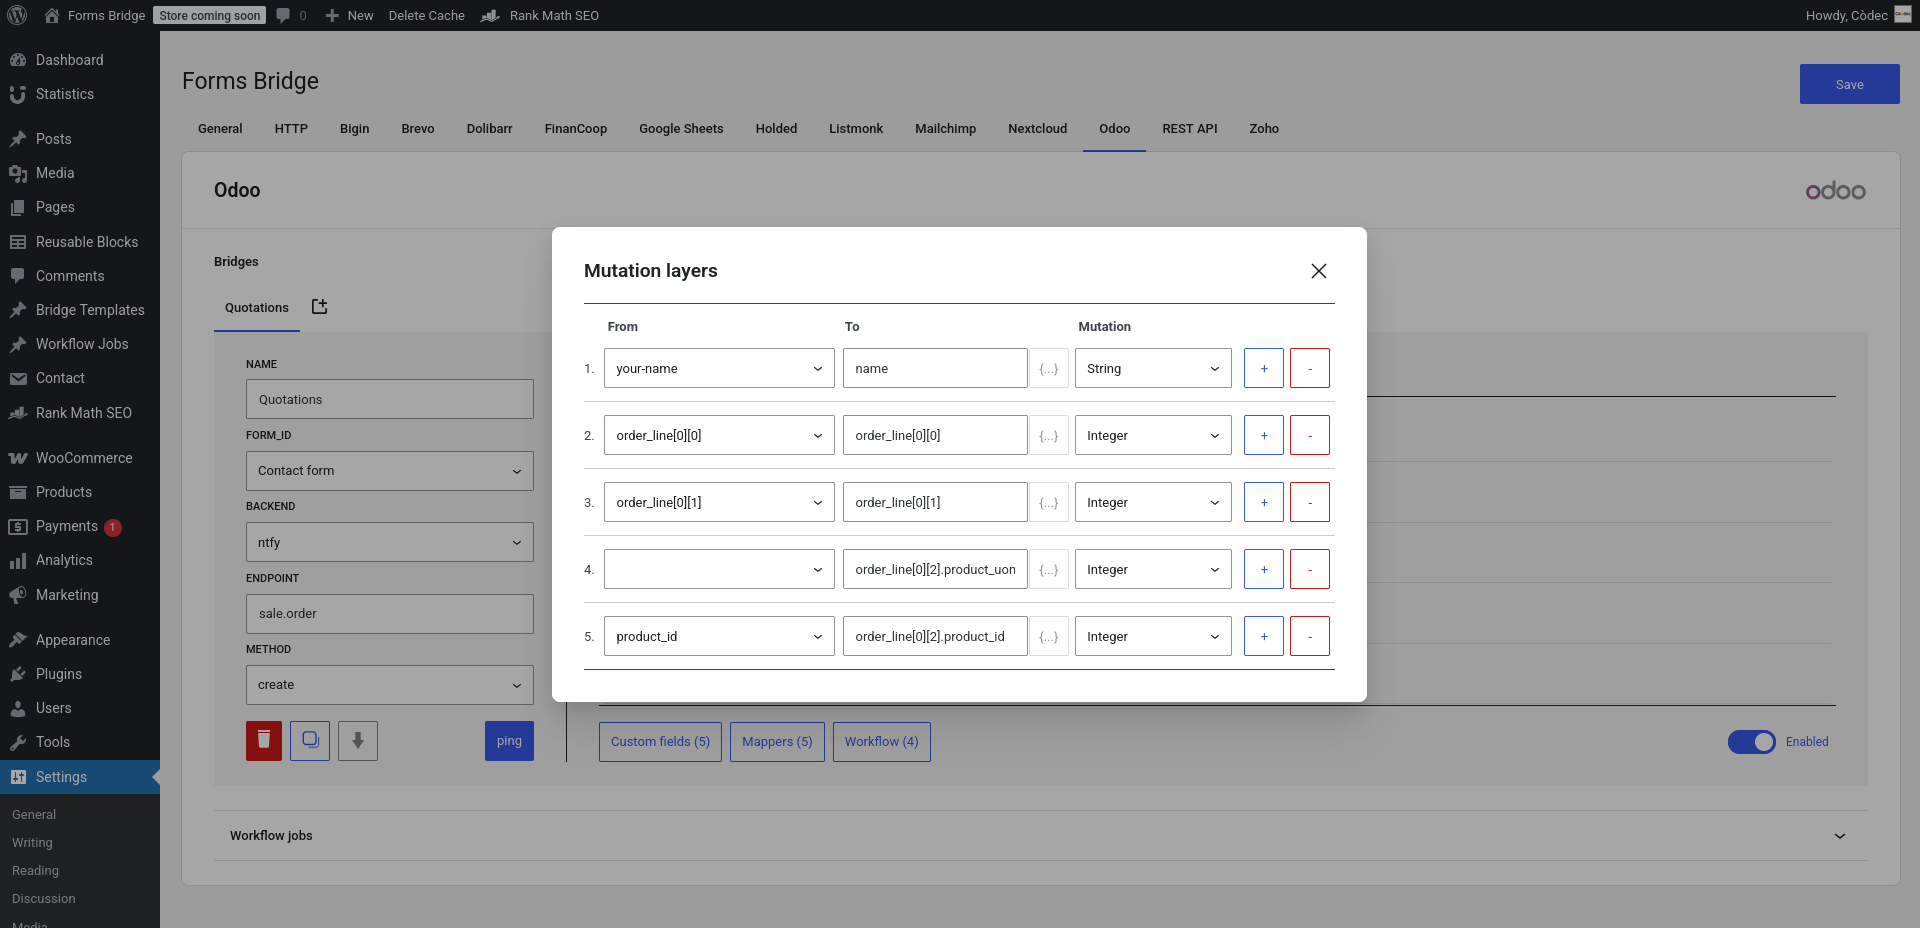
Field mappers are mutations you can apply to the form submission fields to fit the backend endpoint schema. A mapper allows you to rename a submission field as well as apply type mutations to its value.
With mapper’s mutations you can transform the field value. There are three types of mutations:
- Type mutations: With type mutations you can transform your value type to one basic type to another, like string to integer conversions.
- Implode mutations: With implode mutations you can combine multiple values from a data structure into one composed string, like array items count or json data serializations.
- Structure mutations: With structure mutations you can transform your submission structure by adding, removing or renaming its attributes.
The bridge mappers works as a chain of mutations applied sequentially to the submission payload. This means that for each new mapper you add to the chain, its input is the result of the output of the previous layer. Take a look at our Deep dive into field mappers tutorial to see this behavior in action with some examples.
As in the custom fields table, in the field mappers table you can use the introspection API of Forms Bridge to get information about the fields schema of the bridge endpoint. Simply click on the button {…} to get a list of all its fields and its types.
Workflows
With workflows you can combine multiple jobs to setup automations that will be run on each form submission.
The workflow input is the form submission and the output is the bridge payload. If you don’t set up a workflow, the form submissions will be used as bridge payload.
A job is a function that runs on the WordPress backend and receives the payload as input and returns the payload with mutations as the output. In addition to data mutations, jobs can perform actions like databases writes or HTTP requests to the backend API.
Each add-on comes with a predefined set of jobs you can combine to set up your custom workflows. In addition, you can register your own workflow jobs with the jobs editor, take a look at our Jobs editor tutorial.
A workflow can have an arbitrary number of jobs. The submissions will go through the jobs in a sequential order, from the first job to the last one. The output of the last job will be the bridge’s payload.
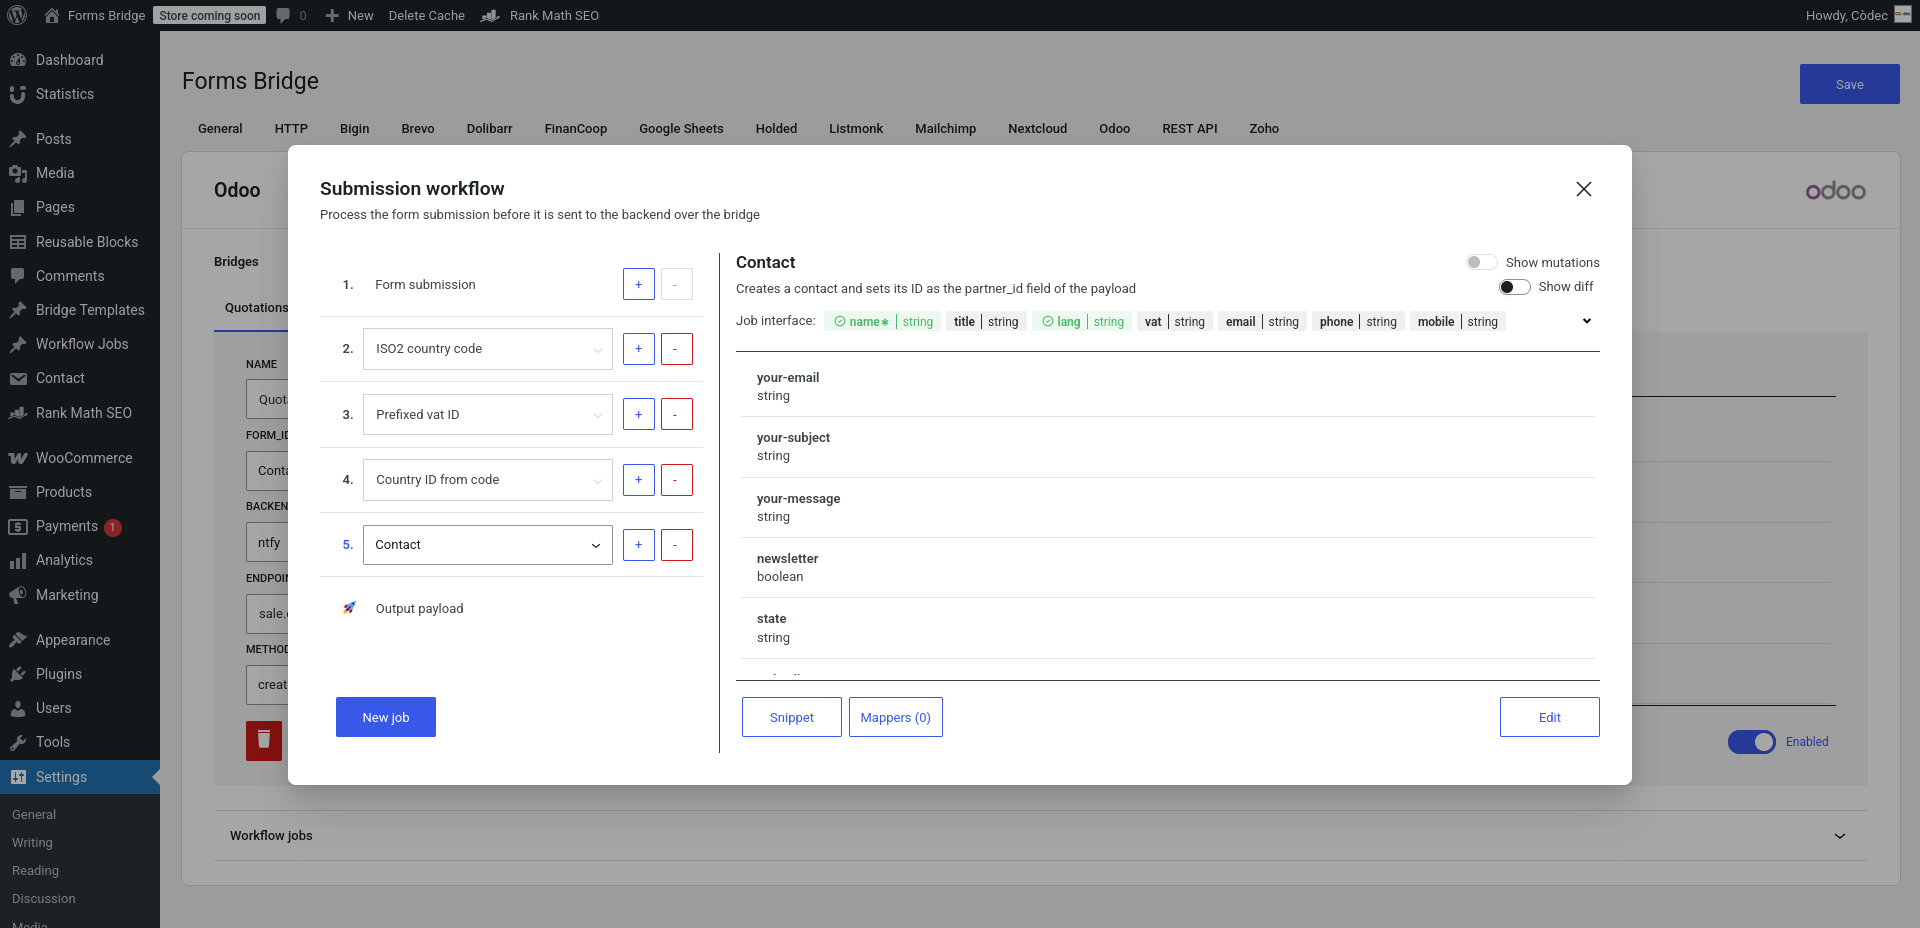
To set up a bridge workflow go to your bridge and click on the Workflow button to open the workflow panel.
The panel is divided in two columns: On the left side you can add, remove or replace jobs from the line. On the right, the panel will show you the current job title, description, fields interface and a representation of the payload schema at this point of the workflow.
By default, a workflow line has one step called Form submission. This step is the start point of every workflow.
The last item of the workflow line is the Output payload step. Go to this step to inspect the schema of the output payload.
Between the form submission and the output payload step, you can add workflow jobs. To add a new job to the chain, the output of the previous step has to fit the next job interface. The job interface is a declaration of required fields and its data types. If the input payload does not fit this interface, the job will be skipped.
To the output of each job it is possible to apply field mappers to transform the output structure to fit the next job interface, or the backend API interface if it is the latter.
As in the custom fields table, in the field mappers table you can use the introspection API of Forms Bridge to get information about the fields schema of the bridge endpoint. Simply click on the button {…} to get a list of all its fields and its types.
Templates
Templates are blueprints of bridges you can use to set up your form integrations. To use a template go to the Add bridge tab of your add-on and click on the Use a template button. After that, the template wizard will be displayed.
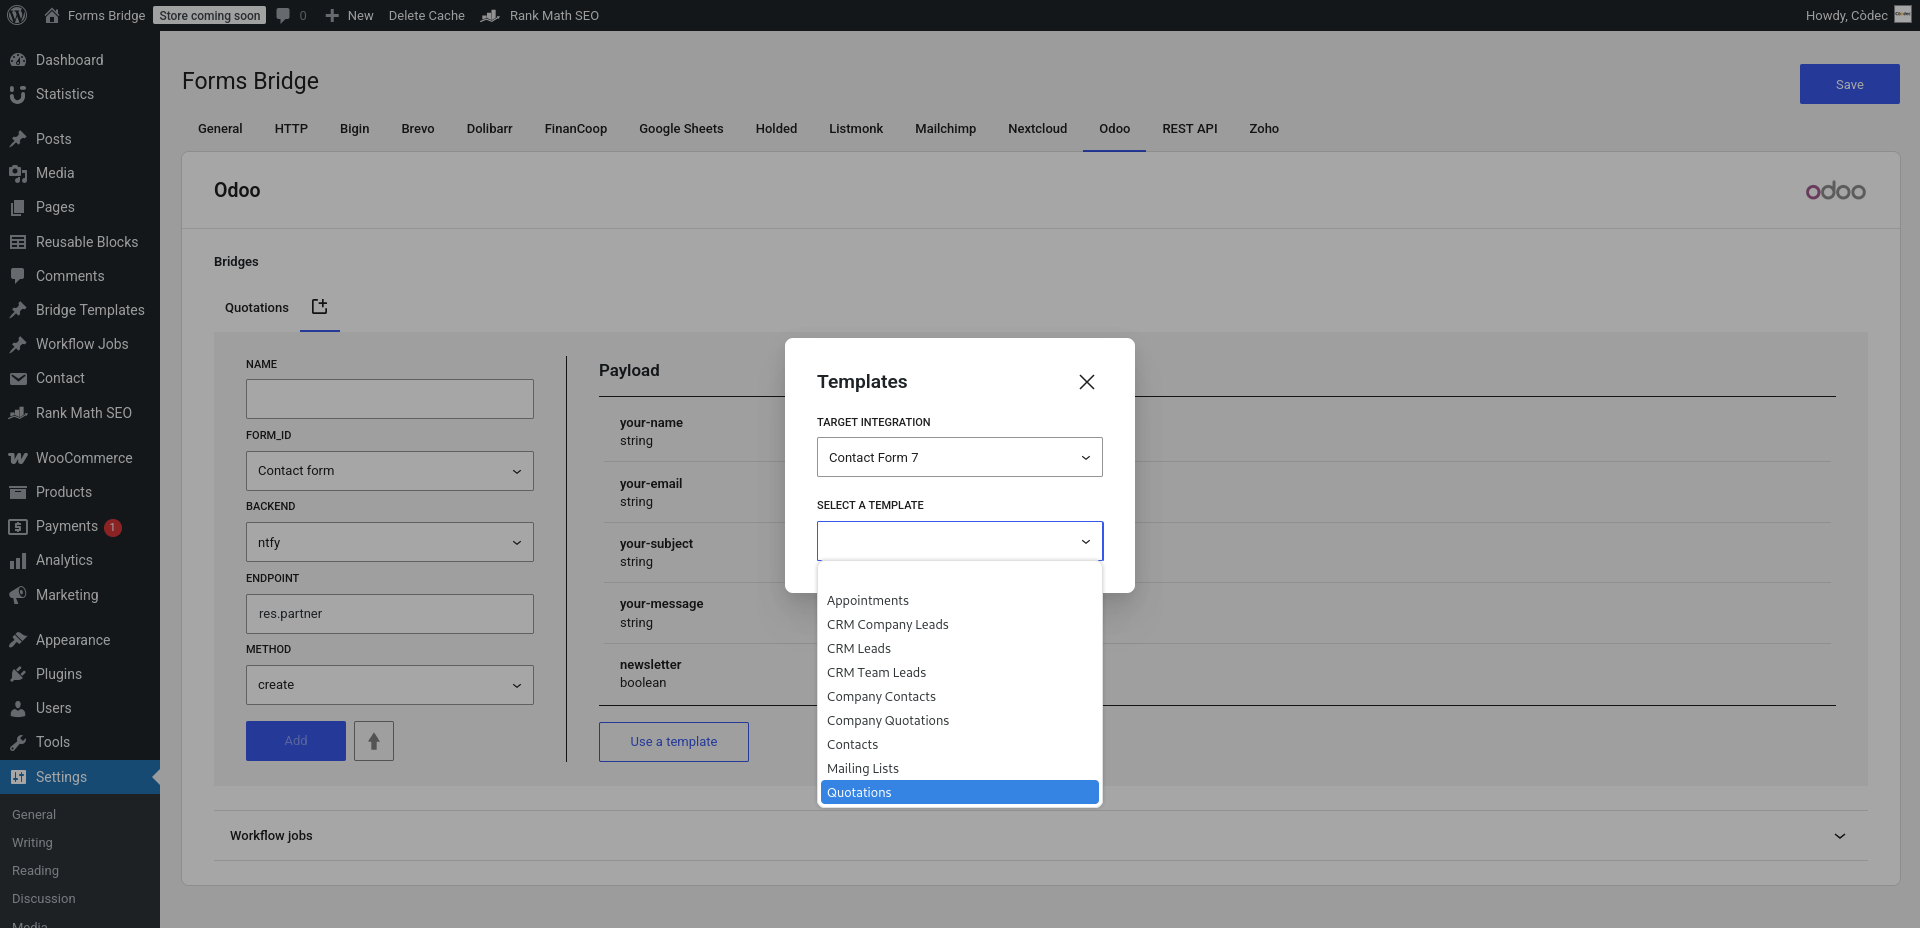
The first step is to choose a form builder (if you have more than one) and a template to use. The form builder is the plugin with which you want to create the new form and the template the blueprint of this form.
The exception of WooCommerce templates.
With WooCommerce you can’t create forms. At the same time, the checkout form of WooCommerce is one of the most famous forms of WP, and most used! For this reason, Forms Bridge support WooCommerce as a form builder, but with a special type of bridge templates. This kind of templates doesn’t create new forms, but a bridge setup that connects WooCommerce order placements with your backends.
Each add-on has its own templates to solve common use cases of its API. Open the templates selector to see all options and choose one. After that, the wizard will guide you on the process.
The 3 (+1) steps of the template wizard are:
- Backend: Setup a new backend connection or reuse an existing one. On this step Forms Bridge performs a ping request to check the connection health before it lets you go forward.
- Form: Fulfill required fields to complete the form blueprint and convert it to a new form. The form will be created after the template submit.
- Bridge: With the backend and the form ready, the wizard will ask you for the bridge. Each bridge’s wizard will ask you for different kind of information to set up the bridge.
To finish the process click on the submit button and a new bridge will be created! If you didn’t reuse a backend connection or a form, these ones will be already created. The new bridge will bind the form with the backend in a ready to use bridge.
The +1 step is the credential step of the wizard. For certain APIs, like Odoo or Zoho, their bridges requires an additional piece of information, the credential. If that is the case, to the three steps enumerated before, it will be an additional step which will ask you for this credential data.
With templates you can get ready to use bridges. You can achieve the same result doing it manually, but with templates you can save a lot of time! We strongly recommend you to check for templates before start creating new bridges, and use them as starter point if your use case its not completely covered by the template result.
Json fingers
A json finger is a hierarchical pointer to data structures like children[0].name.rendered.
Json fingers are used by Forms Bridge as field names to allow the user to manipulate complex data structures on the form submission payload processing.
The syntax is inspired on the JSON standard, hence the name. If JSON is unknown to you, start by reading about the JSON syntax and then, a good playground to learn the concept is the jsonpathfinder project, give it a whirl.
Json fingers are used on custom field names and on field mappers. If your json finger is simple (without path hierarchy), it works as a simple field name, but a the same time, you can break the name into hierarchy levels to create nested objects or items on an array.
For example, if your backend waits for an payload like this:
{
  "name": "Bob",
  "address": {
    "street": "Carrer de Balmes, 250",
	"city": "Barcelona"
  }
}
Then you can use address.street and address.city fingers to point to this nested attributes.
Use them as custom field names to add nested attributes, or as field mappers target names to transform your plain form submissions into nested data structures.
Take a look at our Deep dive into json fingers tutorial if you want to realize the full potential of the json finger syntax.
Add-ons
Forms Bridge comes with free add-ons. Each add-on adds to the plugin new bridges to work with specific APIs, new workflow jobs and bridge templates.
By default, Forms Bridge has the REST API add-on enabled. This is the generic add-on, with an abstract bridge not tied to any API and with which you can set up bridges to work with any API that implements the REST standard.
Because the REST API add-on is intended to be abstract, it does not come with any template or workflow job. Use this kind of bridges to work with your custom APIs.
In addition to the REST API add-on, there are other add-ons tailored to work with specific APIs. To enable or disable this add-ons, go to Settings > General > Add-ons and select which ones you want to enable.
Below you can access the documentation for each one of theme:
API
Forms Bridge has an open API of filters and methods to allow developers to extend Forms Bridge features with PHP. In this chapter we will cover the most interesting of them from the point of view of the developers who wants to integrate their themes or plugins with Forms Bridge.
It isn’t an extensive documentation of the Forms Bridge API. If you want a more in depth knowledge, you can browse the plugin’s code on the github repository 🐱💻.
FBAPI
The FBAPI is a global available object that works as a proxy that allows developers to manage Forms Bridge settings and data. This is the list of available FBAPI methods:
static FBAPI::get_addon
Gets an add-on instance by slug. Add-ons are only available if they are active.
Arguments
stringAdd-on slug.
Return
FORMS_BRIDGE\Addon|nullAdd-on instance, if found, null otherwise.
Example
$addon = FBAPI::get_addon( 'dolibarr' );
if ( $addon && $addon->ping( 'Dolibarr' ) ) {
	$backend_endpoints = $addon->get_endpoints( 'Dolibarr', 'POST' );
}
static FBAPI::get_integration
Gets an integration instance by slug.
Arguments
stringIntegration slug.
Return
FORMS_BRIDGE\Integration|nullIntegration instance, if found, null otherwise.
Example
$integration = FBAPI::get_integration( 'ninja' );
if ( $integration ) {
	$result = $integration->remove_form( 7 );
}
static FBAPI::get_current_form
If there is some bridge submission currently running, returns its related form data.
Return
array|nullForm data.
Example
$form_data = FBAPI::get_current_form();
if ( $form_data ) {
	echo esc_html( $form_data['title'] );
}
static FBAPI::get_form_by_id
Searches for a form by ID and returns its data.
Arguments
stringForm ID in the form{$integration}:{$form_id}.
Return
array|nullForm data.
Example
$form_data = FBAPI::get_form_by_id( 'gf:24' );
if ( $form_data ) {
	foreach ( $form_data['fields'] as $field_data ) {
        # do something
    }
}
static FBAPI::get_forms
Returns the array of available forms data.
Return
arrayArray of form data.
Example
$forms_data = FBAPI::get_forms();
foreach ( $forms_data as $form_data ) {
	$form_ids[] = $form_data['id'];
}
static FBAPI::get_integration_forms
Returns the array of available forms data filtered by integration slug.
Arguments
stringIntegration slug.
Return
arrayArray of the integration’s available forms data.
Example
$form_data = FBAPI::get_addon_forms( 'listmonk' );
foreach ( $forms_data as $form_data ) {
	# do something
}
static FBAPI::get_submission
Returns the current form submission serialized as an array. If there is no current submission, returns null.
Return
array|nullSubmission data.
Example
$submission = FBAPI::get_submission();
if ( $submission ) {
    $user = get_user_by( 'email', $submission['email'] );
    if ( ! $user ) {
        # do something
    }
}
static FBAPI::get_submission_id
Returns the current form submission ID. If there is no current submission, returns null.
Return
string|nullSubmission ID.
Example
$submission_id = FBAPI::get_submission_id();
if ( $submission_id ) {
	$gf_entry = GFAPI::get_entry( $submission_id );
}
static FBAPI::get_uploads
Returns the current form submission uploads. If there is no current submission, returns an empty array.
Return
string|nullSubmission uploads.
Example
$file_paths = array();
$uploads    = FBAPI::get_uploads();

foreach ( $uploads as $upload ) {
    if ( $upload['is_multi'] ) {
        $file_paths = array_merge( $file_paths, $upload['path'] );
    }

	$file_paths[] = $upload['path'];
}
static FBAPI::get_bridge
Searches for a bridge by name and add-on slug.
Arguments
stringBridge name.stringAdd-on slug.
Return
FORMS_BRIDGE\Form_Bridge|nullBridge object or null.
Example
$bridge = FBAPI::get_bridge( 'Contacts', 'odoo' );
if ( $bridge ) {
	$response = $bridge->submit( array(
        'name'  => 'John Doe',
        'email' => 'johndoe@example.coo',
    ) );

    if ( is_wp_error( $response ) ) {
        # handle error
    }
}
static FBAPI::get_current_bridge
Returns the current bridge object. If there is no current submission, returns null.
Return
FORMS_BRIDGE\Form_Bridge|nullBridge object or null.
Example
$bridge = FBAPI::get_current_bridge();
if ( $bridge ) {
	echo esc_html( "{$bridge->name} ({$bridge->addon})" );
}
static FBAPI::get_bridges
Returns the list of available bridges.
Return
FORMS_BRIDGE\Form_Bridge[]Array of bridge objects.
Example
$bridges = FBAPI::get_bridges();
foreach ( $bridges as $bridge ) {
	# do something
}
static FBAPI::get_form_bridges
Returns the list of available bridges.
Arguments
stringForm ID in the form{$integration}:{$form_id}.
Return
FORMS_BRIDGE\Form_Bridge[]Array of bridge objects.
Example
$bridges = FBAPI::get_form_bridges( 'wpforms:10' );
foreach ( $bridges as $bridge ) {
	if ( 'application/json' === $bridge->content_type ) {
        # do something
    }
}
static FBAPI::get_addon_bridges
Returns the list of available bridges filtered by add-on slug.
Arguments
stringAdd-on slug.
Return
FORMS_BRIDGE\Form_Bridge[]Array of bridge objects.
Example
$bridges = FBAPI::get_addon_bridges( 'mailchimp' );
foreach ( $bridges as $bridge ) {
	if ( ! $bridge->is_valid ) {
        continue;
    }

    # do something
}
static FBAPI::save_bridge
Creates or updates the bridge data in the database.
Arguments
arrayBridge data.stringAdd-on slug.
Return
booleanUpdate result.
Example
$bridge_data = array(
    'name'          => 'Leads',
    'backend'       => 'Zoho API',
    'endpoint'      => '/crm/v7/Leads',
    'method'        => 'POST',
    'custom_fields' => array( 'Tags' => array( 'Forms Bridge' ) ),
    'workflow'      => array(),
    'mutations'     => array(),
);

$result = FBAPI::save_bridge( $bridge_data, 'zoho' );
if ( ! $result ) {
    # handle error
}
static FBAPI::delete_bridge
Remove the bridge from the database.
Arguments
stringBridge name.stringAdd-on slug.
Return
booleanUpdate result.
Example
$result = FBAPI::delete_bridge( 'Leads', 'zoho' );
if ( $result ) {
    # do something
}
static FBAPI::get_backends
Returns the list of available backends.
Return
FORMS_BRIDGE\Http\Backend[]Array of backend objects.
Example
$backends = FBAPI::get_backends();
foreach ( $backends as $backend ) {
	if ( str_starts_with( $backend->base_url, 'http://' ) {
        $data = $backend->data();
        $data['base_url'] = str_replace( 'http://', 'https://', $data['base_url'] );
        FBAPI::save_backend( $data );
    }
}
static FBAPI::get_backend
Searches for a backend by name.
Arguments
stringBackend name.
Return
FORMS_BRIDGE\Http\Backend|nullBackend object or null.
Example
$backend = FBAPI::get_backend( 'Dolibarr' );
if ( $backend ) {
	$response = $backend->get( '/api/index.php/status' );
    if ( is_wp_error( $response ) ) {
         # handle error
    }
}
static FBAPI::save_backend
Creates or updates the backend data in the database.
Arguments
arrayBackend data.
Return
booleanUpdate result.
Example
$result = FBAPI::save_backend( array(
    'name'       => 'SuiteCRM',
    'base_url'   => 'https://crm.example.coop',
    'headers'    => array(
        'Content-Type' => 'application/json',
    ),
    'credential' => 'CRM API User',
) );
static FBAPI::delete_backend
Removes the backend from the database.
Arguments
stringBackend name.
Return
booleanUpdate result.
Example
$result = FBAPI::delete_backend( 'SuiteCRM' );
if ( $result ) {
     # do something
}
static FBAPI::get_credentials
Returns the list of available HTTP credentials.
Return
FORMS_BRIDGE\Http\Credential[]Array of credential objects.
Example
$credentials = FBAPI::get_credentials();
foreach ( $credentials as $credential ) {
	if ( 'RPC' === $credential->schema ) {
        $rpc_credentials[] = $credential;
    }
}
static FBAPI::get_credential
Searches for a credential by name.
Arguments
stringCredential name.
Return
FORMS_BRIDGE\Http\Credential|nullCredential object or null.
$credential = FBAPI::get_credential( 'Zulip User' );
if ( $credential ) {
	$authorization = $credential->authorization();
}
static FBAPI::save_credential
Creates or updates the credential data in the database.
Arguments
arrayCredential data.
Return
booleanUpdate result.
Example
$result = FBAPI::save_credential( array(
    'name'          => 'Zulip User',
    'schema'        => 'Basic',
    'client_id'     => 'username',
    'client_secret' => 'user-password',
) );
static FBAPI::delete_credential
Removes the credential from the database.
Arguments
stringCredential name.
Return
booleanUpdate result.
Example
$result = FBAPI::delete_credential( 'Zulip User' );
if ( $result ) {
    # do something
}
Filters
forms_bridge_payload
Filters the submission data to be sent to the backend. If the payload is returned as an array of data, Forms Bridge will encode it as string based on the Conent-Type header of the backend before it is sent.
Arguments
array $payloadSubmission payload.FORMS_BRIDGE\Form_Bridge $bridgeBridge instance.
Return
array|string|nullFiltered payload. If null is returned, bridge submission will be skipped.
Example
add_filter(
    'forms_bridge_payload',
    function ( $payload, $bridge ) {
        $payload['timestamp'] = time();
        return $payload;
    },
    10,
    2,
);
forms_bridge_attachments
Filters attached files to be sent to the backend. Attachment files are only supported by backends with multipart/form-data value of the Content-Type header. Otherwise, Forms Bridge will encode the files as base64 strings and append it to the payload.
Arguments
array $attachmentsSubmission attached files. An attachment is a key value pair with the attachment name and the path to the file.FORMS_BRIDGE\Form_Bridge $bridgeBridge instance.
Return
arrayFiltered attachments.
Example
add_filter(
    'forms_bridge_attachments',
    function ( $attachments, $bridge ) {
        if ( 'subscription' === $bridge->name && isset( $attachments['credit_card'] ) ) {
            unset( $attachments['credit_card'] );
        }

        return $attachments;
    },
    10,
    2,
);
forms_bridge_http_backend_headers
Filters backend HTTP request headers.
Arguments
array $headersAssociative array with HTTP headers.FORMS_BRIDGE\Http\Backend $backendBackend instance.
Return
arrayFiltered HTTP headers.
Example
add_filter(
    'forms_bridge_http_backend_headers',
    function ( $headers, $backend ) {
        $headers['Accept-Language'] = 'es_ES';
        return $headers;
    },
    10,
    2,
);
forms_bridge_http_backend_url
Filters backend request URLs.
Arguments
string $urlSubmission request URL.FORMS_BRIDGE\Http\Backend $backendBackend instance.
Return
stringFiltered URL.
Example
add_filter(
    'forms_bridge_http_backend_url',
    function ( $url, $backend ) {
        $url = str_replace( 'http://', 'https://', $url );
        return $url;
    },
    10,
    2,
);
forms_bridge_http_request
Filters the backend request params before it is sent. Forms Bridge use the WP_Http under the hood. Check out the WP_Http::request documentation for more details about the params.
Arguments
array $paramsHTTP request params.
Return
arrayFiltered HTTP request params.
Example
add_filter(
    'forms_bridge_http_request',
    function ( $request ) {
        $request['args']['ssl_verify'] = false;
        return $request;
    },
    10,
    1,
);
forms_bridge_prune_empties
Controls if Forms Bridge should clean up the submission data and prune its empty fields.
Arguments
boolean $pruneTrue by default, use this filter to avoid the payload prune.FORMS_BRIDGE\Form_Bridge $bridgeBridge instance.
Return
booleanTrue value will trigger a prune of the empty values of the submission payload. An empty value is a null value or an empty string.
Example
add_filter( 'forms_bridge_prune_empties', '__return_true' );forms_bridge_skip_submission
Controls if Forms Bridge should skip the form submission.
Arguments
boolean $skipFalse by default, use this filter to skip bridge submissions.FORMS_BRIDGE\Form_Bridge $bridgeBridge instance.
Return
booleanTrue value will skip the bridge submission.
Example
add_filter(
    'forms_bridge_skip_submission',
    function ( $skip, $bridge ) {
        if ( 'skip' === $bridge->name ) {
            return true;
        }

        return $skip;
    },
    10,
    2,
);
forms_bridge_woo_trigger_submission
Controls if Forms Bridge should trigger the bridge submission on each order status change.
Arguments
boolean $triggerTrue if new status iscompleted, false otherwise.integer $order_idID of the current order.string $new_statusNew order status.string $old_statusOld order status.boolean $is_bridgeBoolean value that tracks if the order has been already bridged.
Return
booleanTrue value will trigger the bridge submission.
Example
add_filter(
    'forms_bridge_woo_trigger_submission',
    function ( $trigger, $order_id, $new_status, $old_status, $is_bridged ) {
        if ( ! $is_bridged && 'processing' === $old_status ) {
            return true;
        }

        return $trigger;
    },
    10,
    5,
);
forms_bridge_skip_error_notification
Controls if Forms Bridge should skip the error email notification.
Arguments
boolean $skipFalse by default, if return as true email notification will be skipped.WP_Error $errorInstance of the catcher error.FORMS_BRIDGE\Form_Bridge $bridgeCurrent bridge instance.array $payloadCurrent bridge payload.array $attachmentsCurrent bridge attachments.
Return
booleanTrue value will skip the error email notification.
Example
add_filter(
    'forms_bridge_skip_error_notification',
    function ( $skip, $error, $bridge, $payload, $attachments ) {
        $error_response = $error->get_error_data()['response'];
        if ( 401 === $error_response['code'] ) {
            return true;
        }

        return $skip;
    },
    10,
    5,
);
posts_bridge_introspection_ping
Filters the result of a ping introspection request of the REST API add-on (for custom integrations).
Arguments
boolean $resultTrue if the backend is successfully reached, false otherwise.string $backendBackend name.
Return
booleanPing result.
Example
add_filter(
    'posts_bridge_introspection_ping',
    function ( $result, $backend ) {
        if ( 'Placeholder' === $backend ) {
            return true;
        }

        return $result;
    },
    10,
    2,
);
posts_bridge_introspection_endpoints
posts_bridge_introspection_endpointsFilters the response of an endpoints introspection request of the REST API add-on (for custom integrations).
Arguments
string[] $endpointsList of available endpoints.string $backendBackend name.
Return
string[]List of available endpoints.
Example
add_filter(
    'posts_bridge_introspection_endpoints',
    function ( $endpoints, $backend ) {
        if ( 'Placeholder' === $backend ) {
            return array(
               '/posts',
               '/comments',
               '/albums',
               '/photos',
               '/todos',
            );
        }

        return $endpoints;
    },
    10,
    2,
);
posts_bridge_introspection_schema
posts_bridge_introspection_schemaFilters the response of endpoint schema introspection request of the REST API add-on (for custom integrations).
Arguments
array $schemaList of available endpoints.string $backendBackend name.string $endpointTarget endpoint.
Return
arrayEndpoint fields json schema.
Example
add_filter(
    'posts_bridge_introspection_schema',
    function ( $schema, $backend, $endpoint ) {
        if ( 'Placeholder' !== $backend || '/posts' !== $endpoint ) {
            return $schema;
        }

        return array(
            array(
                'name' => 'id',
                'schema' => array( 'type' => 'integer' ),
            ),
            array(
                'name' => 'userId',
                'schema' => array( 'type' => 'integer' ),
            ),
            array(
                'name' => 'title',
                'schema' => array( 'type' => 'string' ),
            ),
            array(
                'name' => 'body',
                'schema' => array( 'type' => 'string' ),
            ),
        );
    },
    10,
    3,
);
Actions
forms_bridge_before_submission
Action to do just before submission has been sent to the backend.
Arguments
FORMS_BRIDGE\Form_Bridge $bridgeBridge instance.array $payloadPayload data.array $attachmentsAttachments list.
Example
add_action(
    'forms_bridge_before_submission',
    function ( $bridge, $payload, $attachments ) {
        # do something
    },
    10,
    3,
);
forms_bridge_after_submission
Action to do after the submission has been successfully sent to the backend.
Arguments
FORMS_BRIDGE\Form_Bridge $bridgeBridge instance.array $responseRequest response data.array $payloadPayload data.array $attachmentsAttachments list.
Example
add_action(
    'forms_bridge_after_submission',
    function ( $bridge, $response, $payload, $attachments ) {
        # do something
    },
    10,
    4,
);
forms_bridge_on_failure
Action to do after a bridge submission error.
Arguments
FORMS_BRIDGE\Form_Bridge $bridgeBridge instance.WP_Error $errorRequest error response.array $payloadPayload data.array $attachmentsAttachments list.
Example
add_action(
    'forms_bridge_on_failure',
    function ( $bridge, $error, $payload, $attachments ) {
        # do something
    },
    10,
    4,
);