
In this tutorial we will explain how to bridge your WooCommerce orders to Listmonk. The resulting bridge will subscribe new customers from WooCommerce to our mailing lists.
This tutorial assumes you have an running Listmonk instance with access to the REST API.
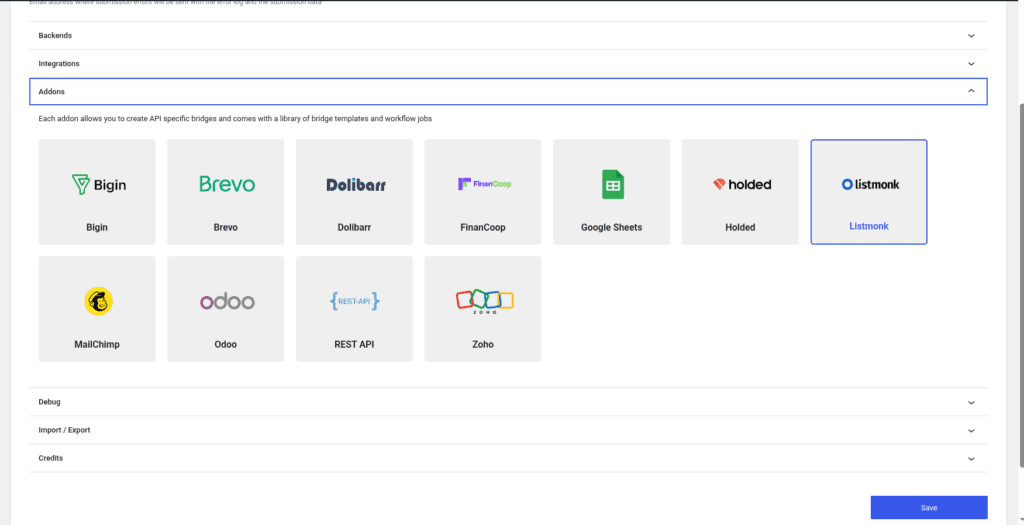
Enable the addon
The first step is to enable the Listmonk addon on the general tab of the settings page.
Once the addon is enabled, we can create bridges to work with the REST API. In addition Forms Bridge offers some templates to start creating our bridges, and workflow jobs.
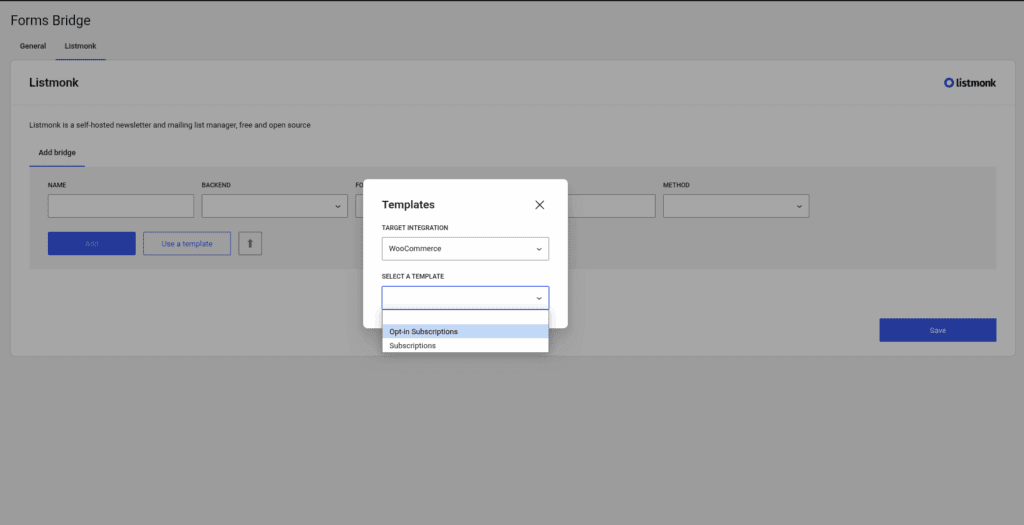
The template wizard
To streamline the creation process, we will use the Opt-in Subscriptions template from the addon. To use it, simply go to Add bridge tab on the addon’s page and click on Use a template. After that, the template wizard will be displayed. On the templates dropdown, select the option Opt-in Subscriptions.
The Opt-in Subcription template is a WooCommerce bridge template and its only available if you have WooCommerce installed and selected as the target integration.
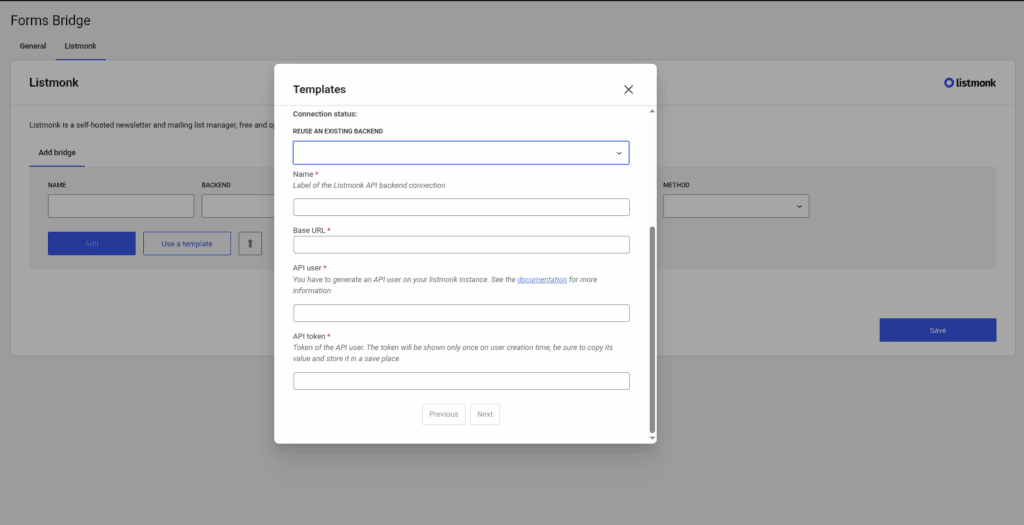
The backend step
The next step on the wizard will ask us for the backend connection. The backend connection will ask us for a name, the URL and the API user and token. Leave the default backend name and set the URL of your Listmonk instance as the URL value.
To get the API user and token values you have to create a new API user. Checkout the addon documentation to get more details if you need help with the process. Once you got the API user created, copy the user name and its API token and fill the wizard form and Forms Bridge will perform a ping to the backend to check the health of the connection. If all goes well, the template wizard will allow us to continue.
This step is only required if you already don’t have any backend connection. If you’ve created a backend before, you can simply reuse it and click next.
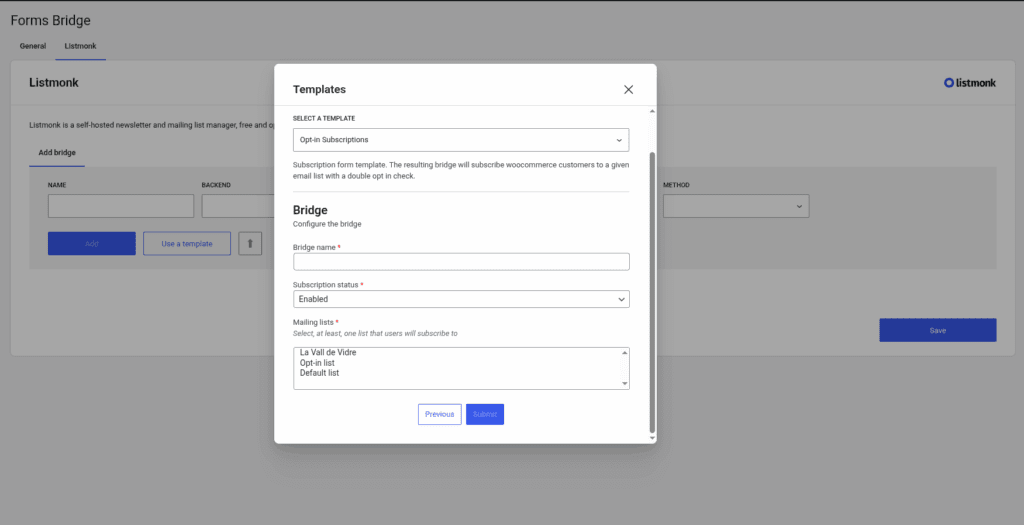
The bridge step
To finish, the wizard will ask us for the bridge name (remember, it should be unique as it is the identifier), the Subscription status and the mailing lists into which you want to get your customers subscribed. Now click on submit and let the magic happen. Behind the curtain, Forms Bridge will create the backend connection and a new bridge that will connect the Woo Checkout form with the backend.
The bridge workflow
After using the template you will have a bridge with the following workflow:
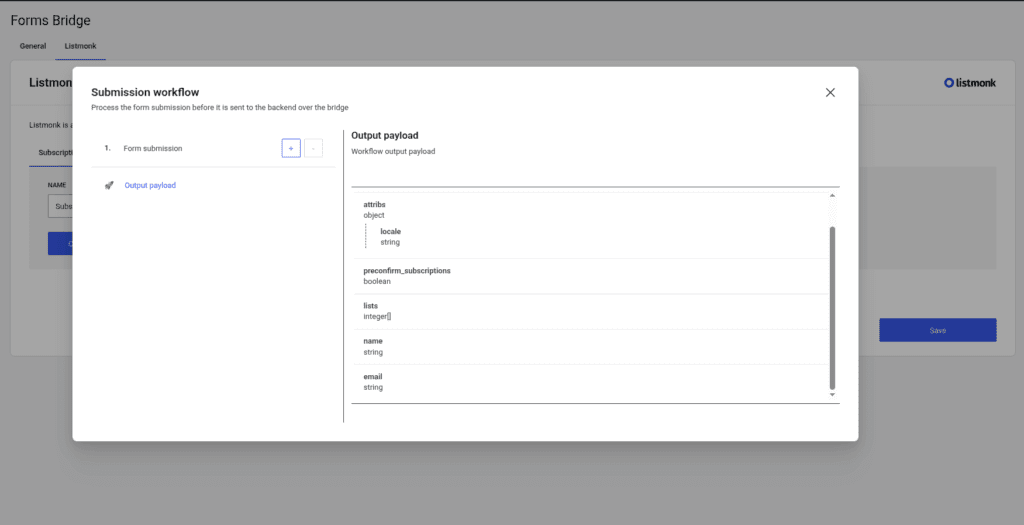
As you can see its a simple workflow that only has some mutation layers on the Form submission step to prune all unnecessary order data and map the billing fields to the mailing list subscription endpoint.
At this point, the output of the pipeline should be a payload like this:
{
  "status": "subscribed",
  "attribs": {
    "locale": "$locale"
  },
  "precomfirm_subscription": false,
  "lists": [1],
  "name": "Bob",
  "email": "bob@email.me"
}
Additional configuration
At this point, the bridge is ready for use, you can stop here or continue editing the bridge with custom configurations to fit your specific use case.
For example, imagine you want to get the WooCommerce customer id stored as a custom attribute on listmonk contacts. Okay, let’s do it. You simple have to open the mutation layers editor on the Form submission step of the workflow and add the following line:
| customer_id | attribs.wc_customer_id | Integer |
An other interesting customization could be to place a checkbox on the woo checkout form to ask users for permissions to subscribe them to the mailing lists. To get this done you have to register a new field to the checkout form with something like this:
add_filter('woocommerce_checkout_fields', function ($fields) {
    $fields['billing']['listmonk'] = [
        'type' => 'text',
        'label' => 'Newsletter subscription',
        'required' => false,
        'priority' => 20,
    ];

    return $fields;
}, 100, 1);

add_action('woocommerce_checkout_create_order', function ($order, $data) {
    if (!empty($data['listmonk'])) {
        $order->update_meta_data('listmonk', $data['listmonk']);
    }
}, 100, 2);
Place this snippet in your theme’s functions.php file and after that come back to the bridge workflow panel. If you open the mutation layers again you will find a new billing field named listmonk on the bridge payload! Now, lets map this field with the following mapper:
| billing.listmonk | listmonk | Boolean |
Now all we need to do is to add a new job to the pipeline. Click on the + button and select the Skip subscription job. With this job on the workflow, bridge submission will be skipped if the listmonk field comes to false and your checkout form will be more GDPR compliance 👼.
If you need to go further with payload mutations you always can use the forms_bridge_payload filter to mangle your bridge submissions with PHP and all of its power and flexibility. Check out the API documentation.
To conclude, its worth to mention that you can get the same bridge setup doing it manually, but with templates you can save a lot of time! We strongly recommend you to check for templates before start creating new bridges.